> ## Documentation Index
> Fetch the complete documentation index at: https://docs.numeral.com/llms.txt
> Use this file to discover all available pages before exploring further.
# Salesforce Commerce Cloud
> Real-time tax calculation at checkout for Salesforce B2C Commerce, powered by the plugin_numeral cartridge.
The Numeral cartridge for Salesforce B2C Commerce (SFCC) calculates tax during checkout and records each completed order as a transaction in Numeral. Setup has three phases:
1. **Create an OCAPI client** in Account Manager so Numeral can sync your catalog and orders
2. **Install the `plugin_numeral` cartridge** on your storefront
3. **Connect** your SFCC instance to Numeral and validate the integration
This integration requires Business Manager admin access, Account Manager access, and a WebDAV client (Cyberduck recommended).
***
## Phase 1 — Configure the OCAPI client
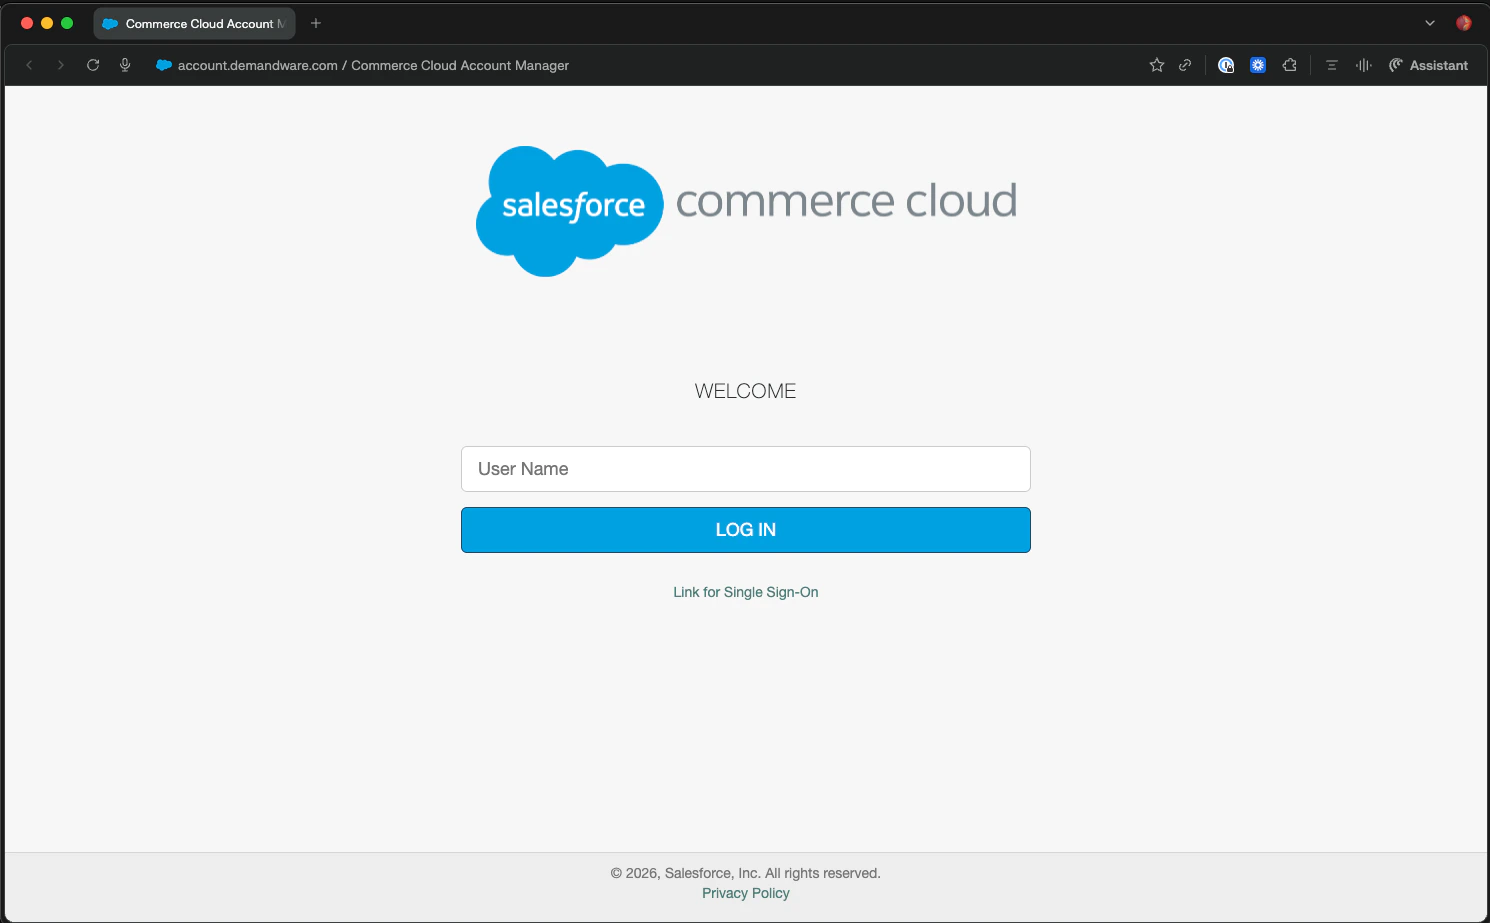
### 1. Sign in to Account Manager
Go to [account.demandware.com](https://account.demandware.com) and sign in with your administrator credentials.
 ### 2. Add an API client
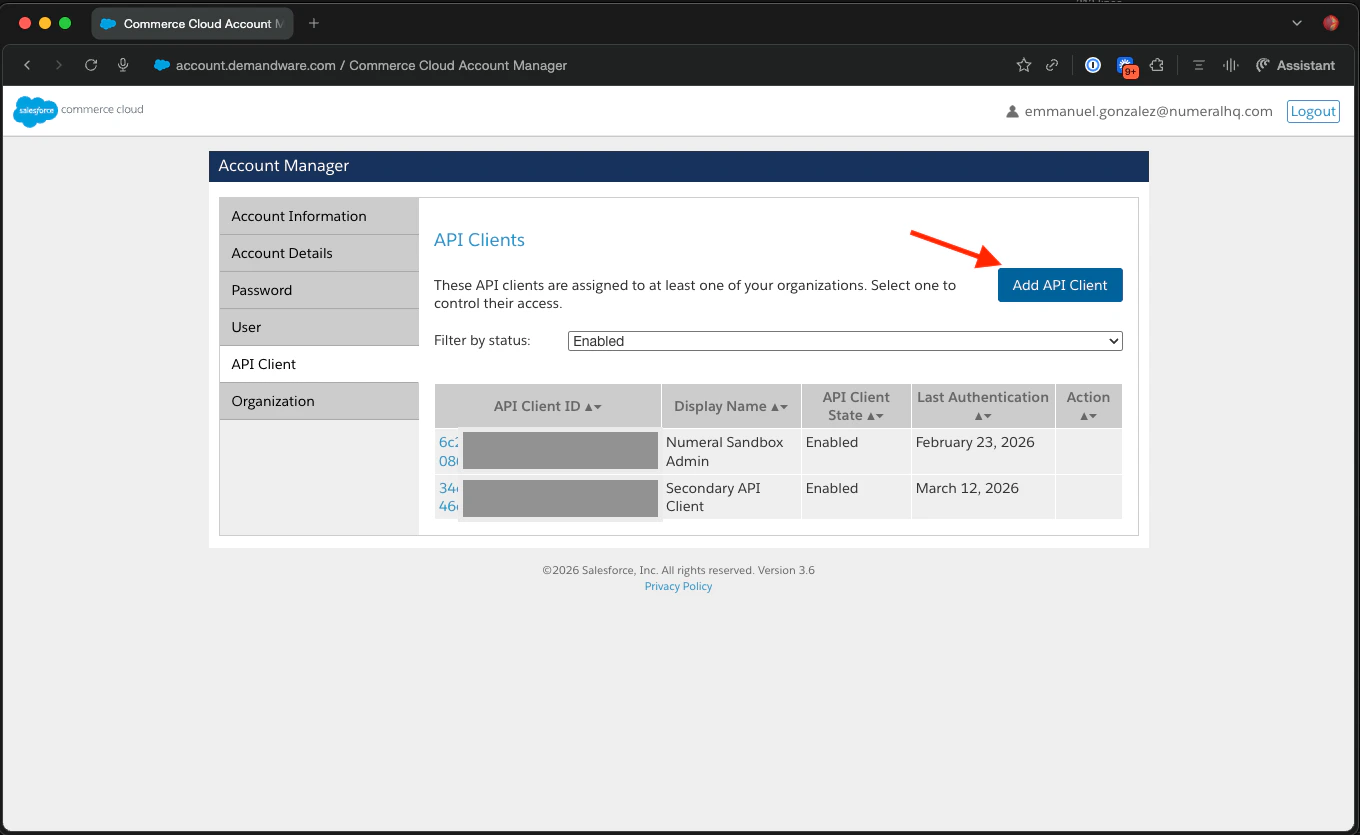
Under **API Client**, click **Add API Client**. Use **Display Name** `Numeral Integration`.
### 2. Add an API client
Under **API Client**, click **Add API Client**. Use **Display Name** `Numeral Integration`.
 ### 3. Configure the API client
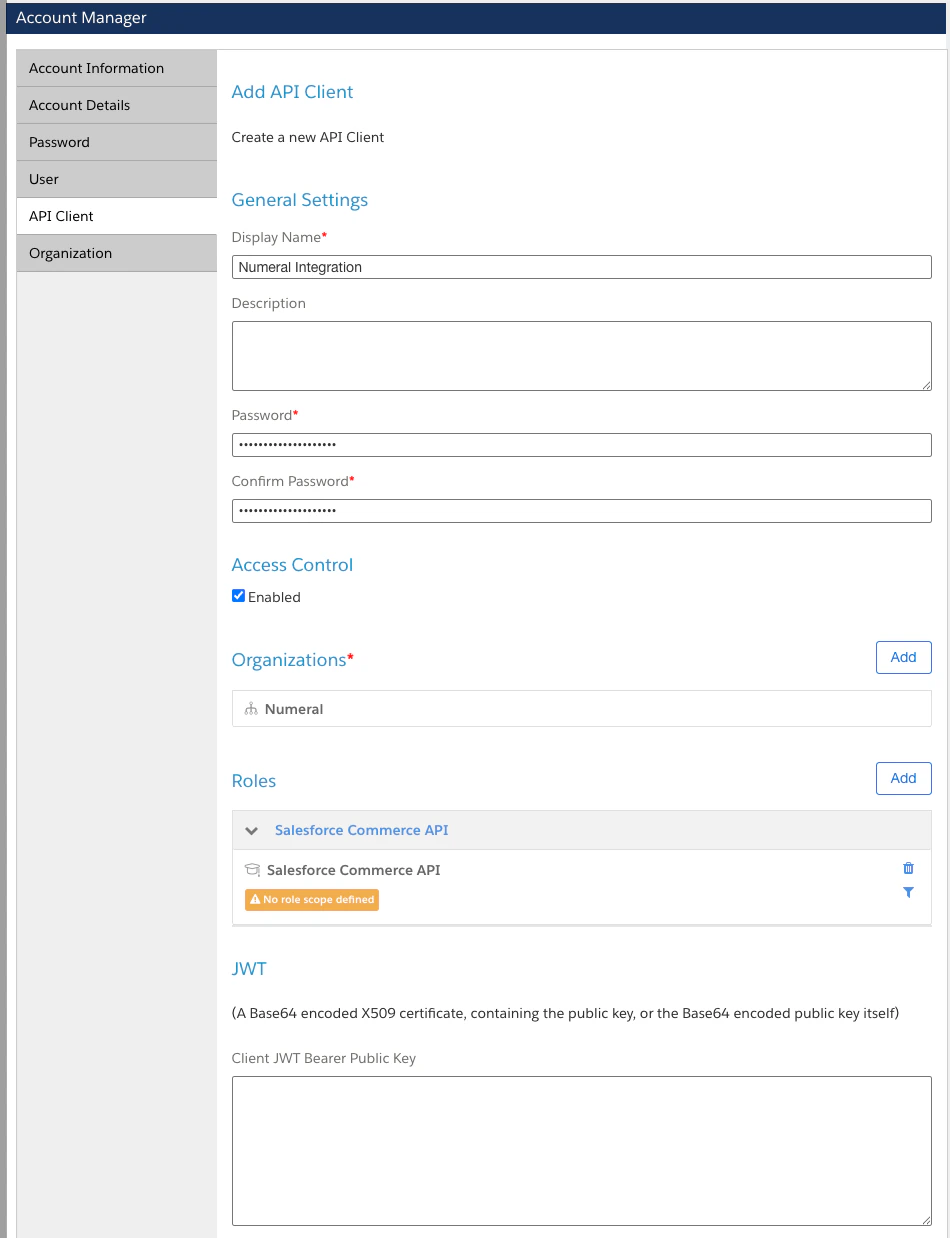
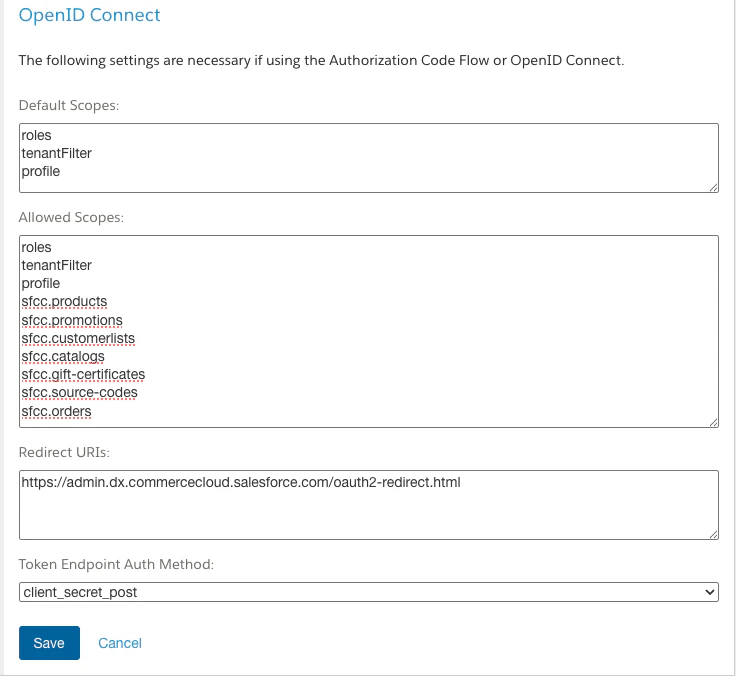
Set the following fields:
* **Token Endpoint Auth Method**: `client_secret_post`
* **Access Token Format**: `JWT`
* **Default Scopes**: leave blank
* **Allowed Scopes**:
* `sfcc.products`
* `sfcc.promotions`
* `sfcc.customerlists`
* `sfcc.catalogs`
* `sfcc.gift-certificates`
* `sfcc.source-codes`
* `sfcc.orders`
### 3. Configure the API client
Set the following fields:
* **Token Endpoint Auth Method**: `client_secret_post`
* **Access Token Format**: `JWT`
* **Default Scopes**: leave blank
* **Allowed Scopes**:
* `sfcc.products`
* `sfcc.promotions`
* `sfcc.customerlists`
* `sfcc.catalogs`
* `sfcc.gift-certificates`
* `sfcc.source-codes`
* `sfcc.orders`
 ### 4. Assign roles
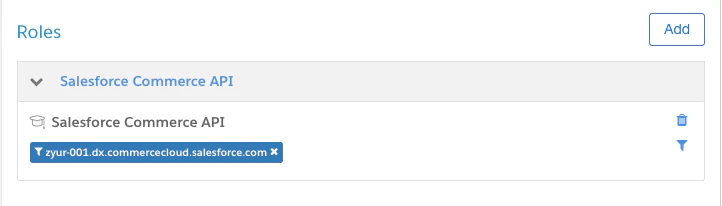
Assign the API client the **Salesforce Commerce API** and **Sandbox API User** roles, scoped to the organization that owns your storefront.
### 4. Assign roles
Assign the API client the **Salesforce Commerce API** and **Sandbox API User** roles, scoped to the organization that owns your storefront.
 ### 5. Set the redirect URI
Add this redirect URI:
```text theme={null}
https://admin.dx.commercecloud.salesforce.com/oauth2-redirect.html
```
### 5. Set the redirect URI
Add this redirect URI:
```text theme={null}
https://admin.dx.commercecloud.salesforce.com/oauth2-redirect.html
```
 ### 6. Configure OCAPI Shop API and Data API
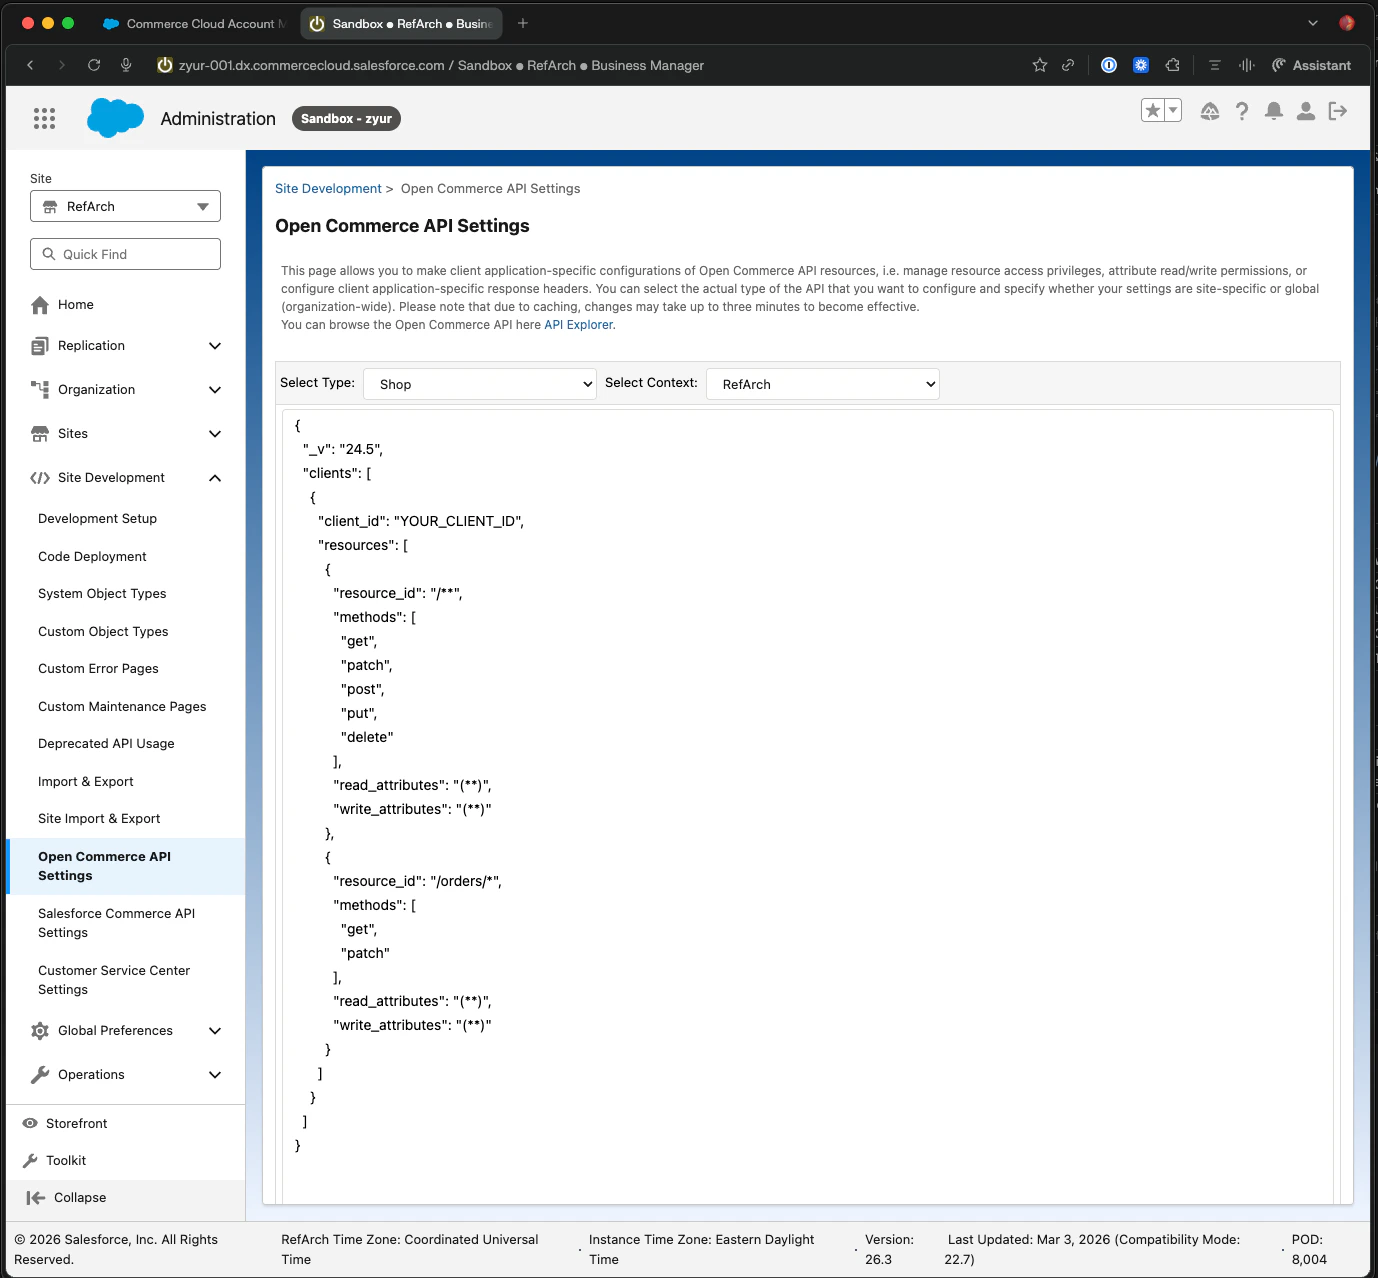
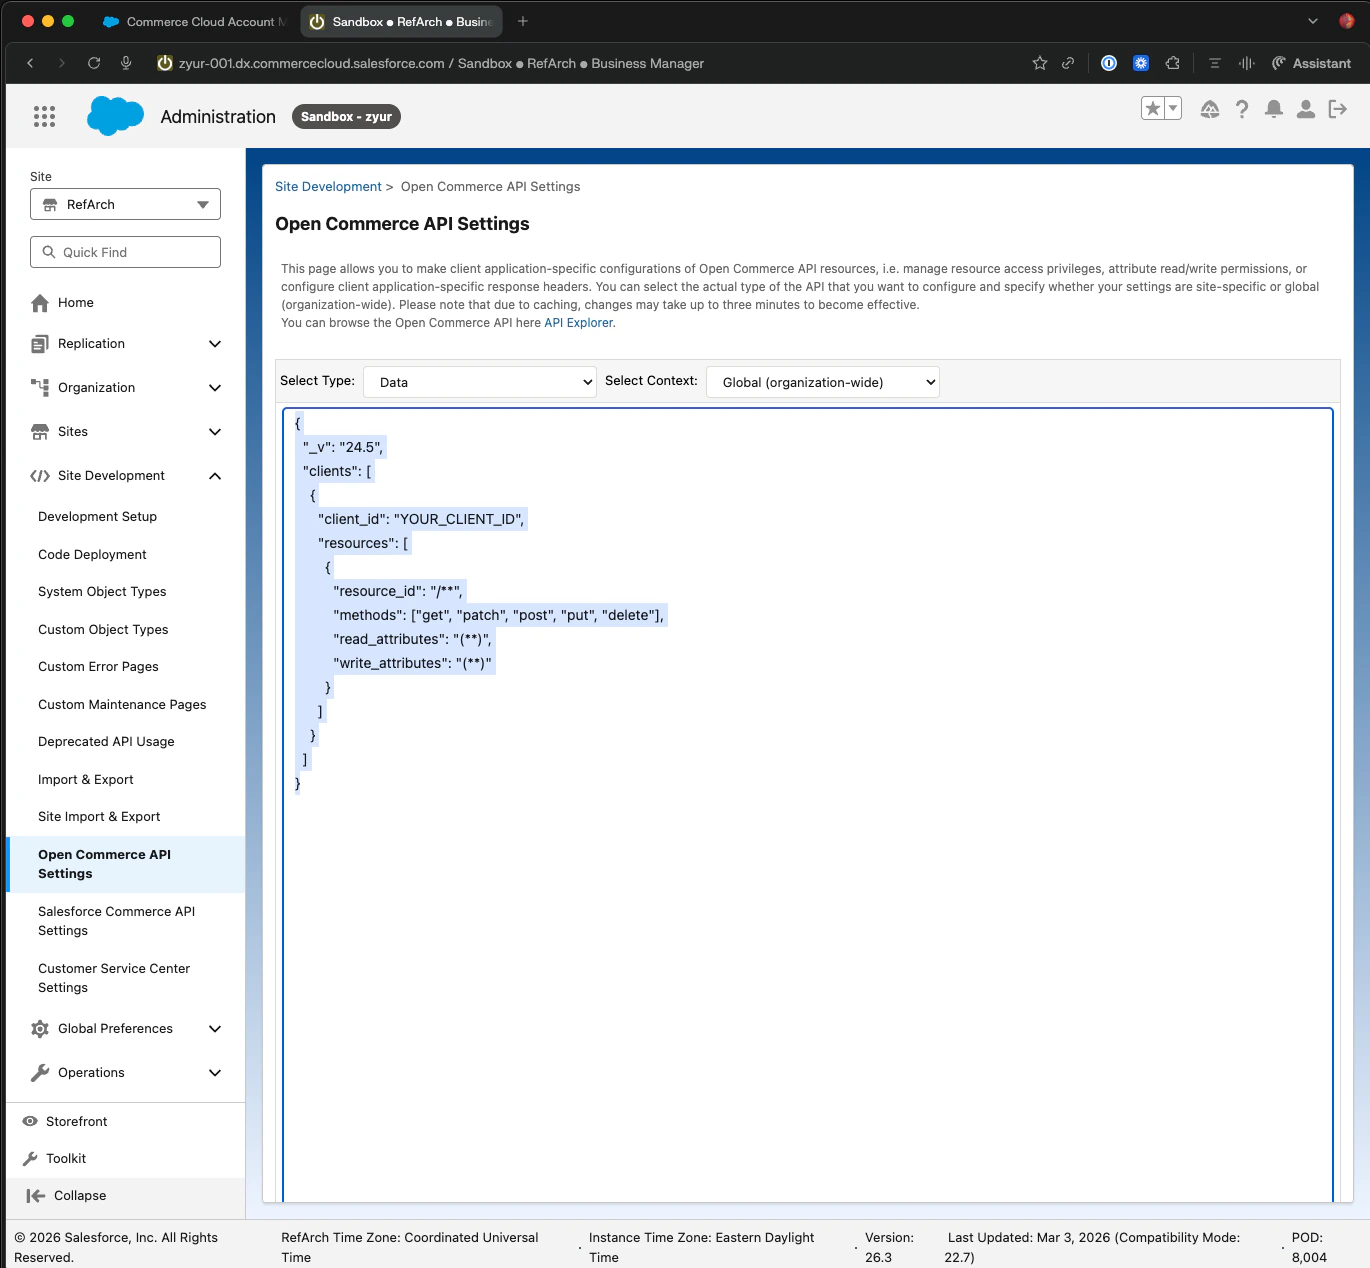
In **Business Manager → Administration → Site Development → Open Commerce API Settings**, paste the JSON configuration provided by Numeral for both **Shop API** and **Data API** contexts.
### 6. Configure OCAPI Shop API and Data API
In **Business Manager → Administration → Site Development → Open Commerce API Settings**, paste the JSON configuration provided by Numeral for both **Shop API** and **Data API** contexts.
 ### 7. Capture the connection details
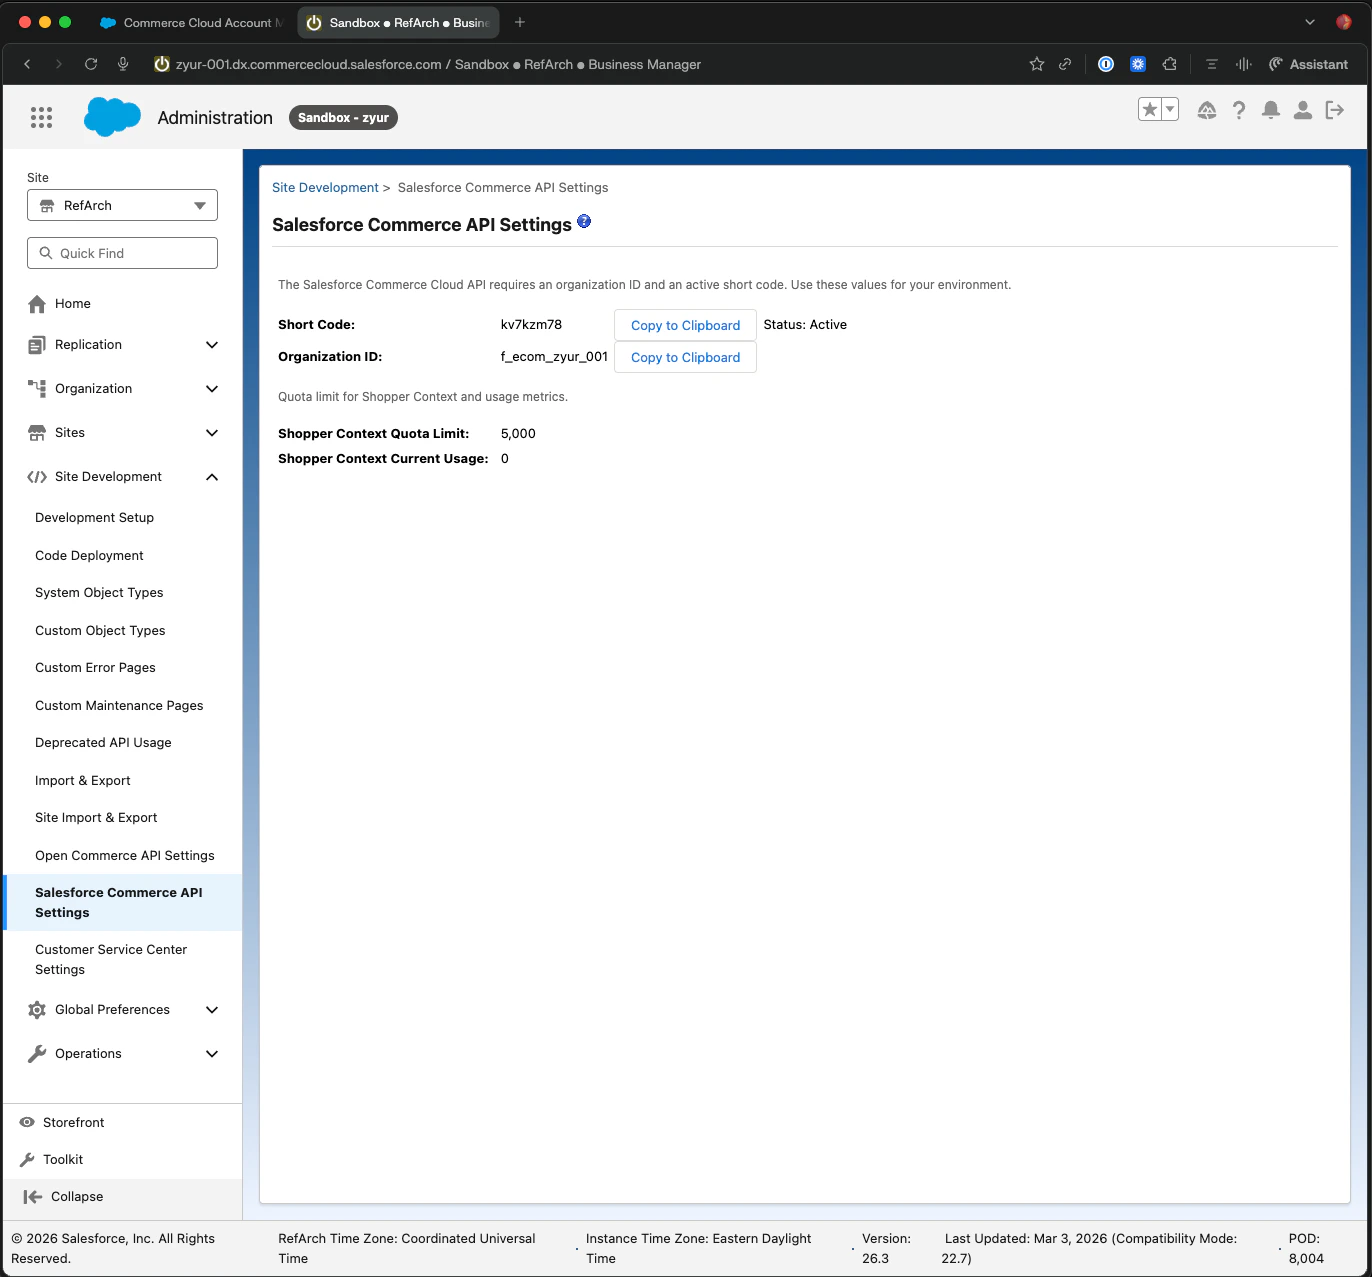
Save the seven values you'll provide to Numeral:
| Value | Where to find it |
| ----------------- | --------------------------------------------------------------------------------------- |
| Client ID | Account Manager → API Client |
| Client Secret | Account Manager → API Client (shown once) |
| Organization ID | Business Manager → Administration → Site Development → Salesforce Commerce API Settings |
| Short Code | Same screen as Organization ID |
| Instance Hostname | The host portion of your Business Manager URL |
| Site ID | Business Manager → Administration → Sites → Manage Sites |
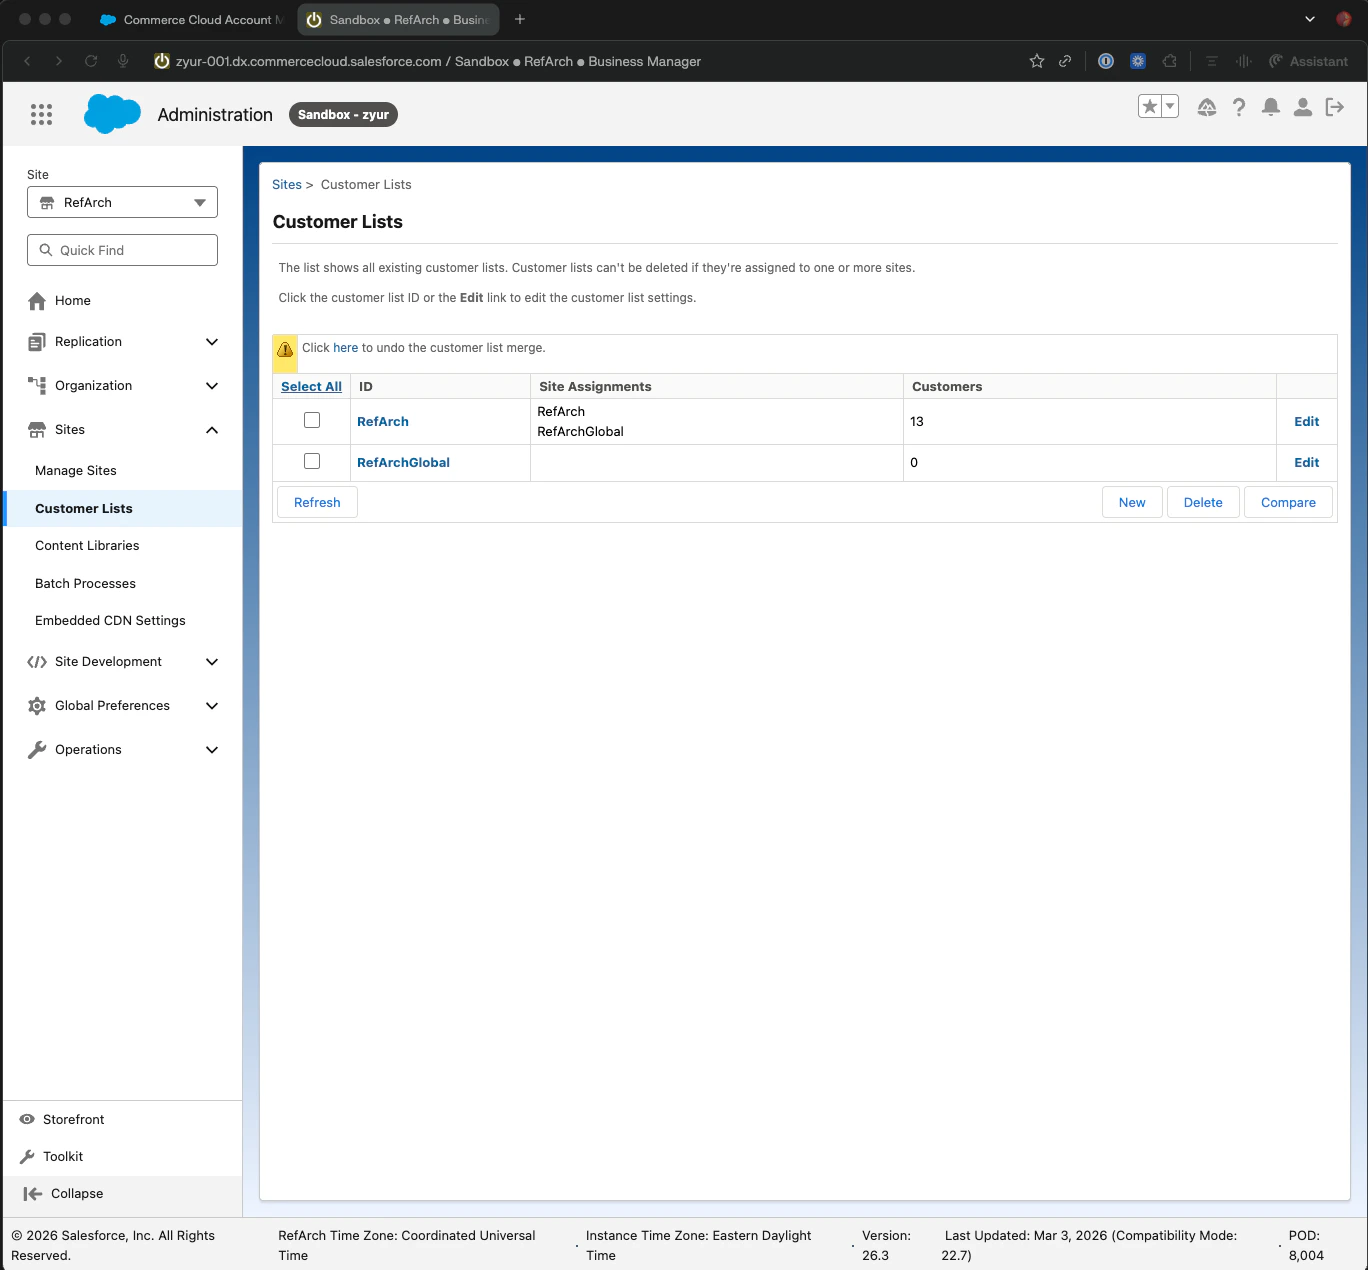
| Customer List ID | Business Manager → Administration → Sites → Customer Lists |
### 7. Capture the connection details
Save the seven values you'll provide to Numeral:
| Value | Where to find it |
| ----------------- | --------------------------------------------------------------------------------------- |
| Client ID | Account Manager → API Client |
| Client Secret | Account Manager → API Client (shown once) |
| Organization ID | Business Manager → Administration → Site Development → Salesforce Commerce API Settings |
| Short Code | Same screen as Organization ID |
| Instance Hostname | The host portion of your Business Manager URL |
| Site ID | Business Manager → Administration → Sites → Manage Sites |
| Customer List ID | Business Manager → Administration → Sites → Customer Lists |
 ***
## Phase 2 — Install the cartridge
### 1. Connect to WebDAV
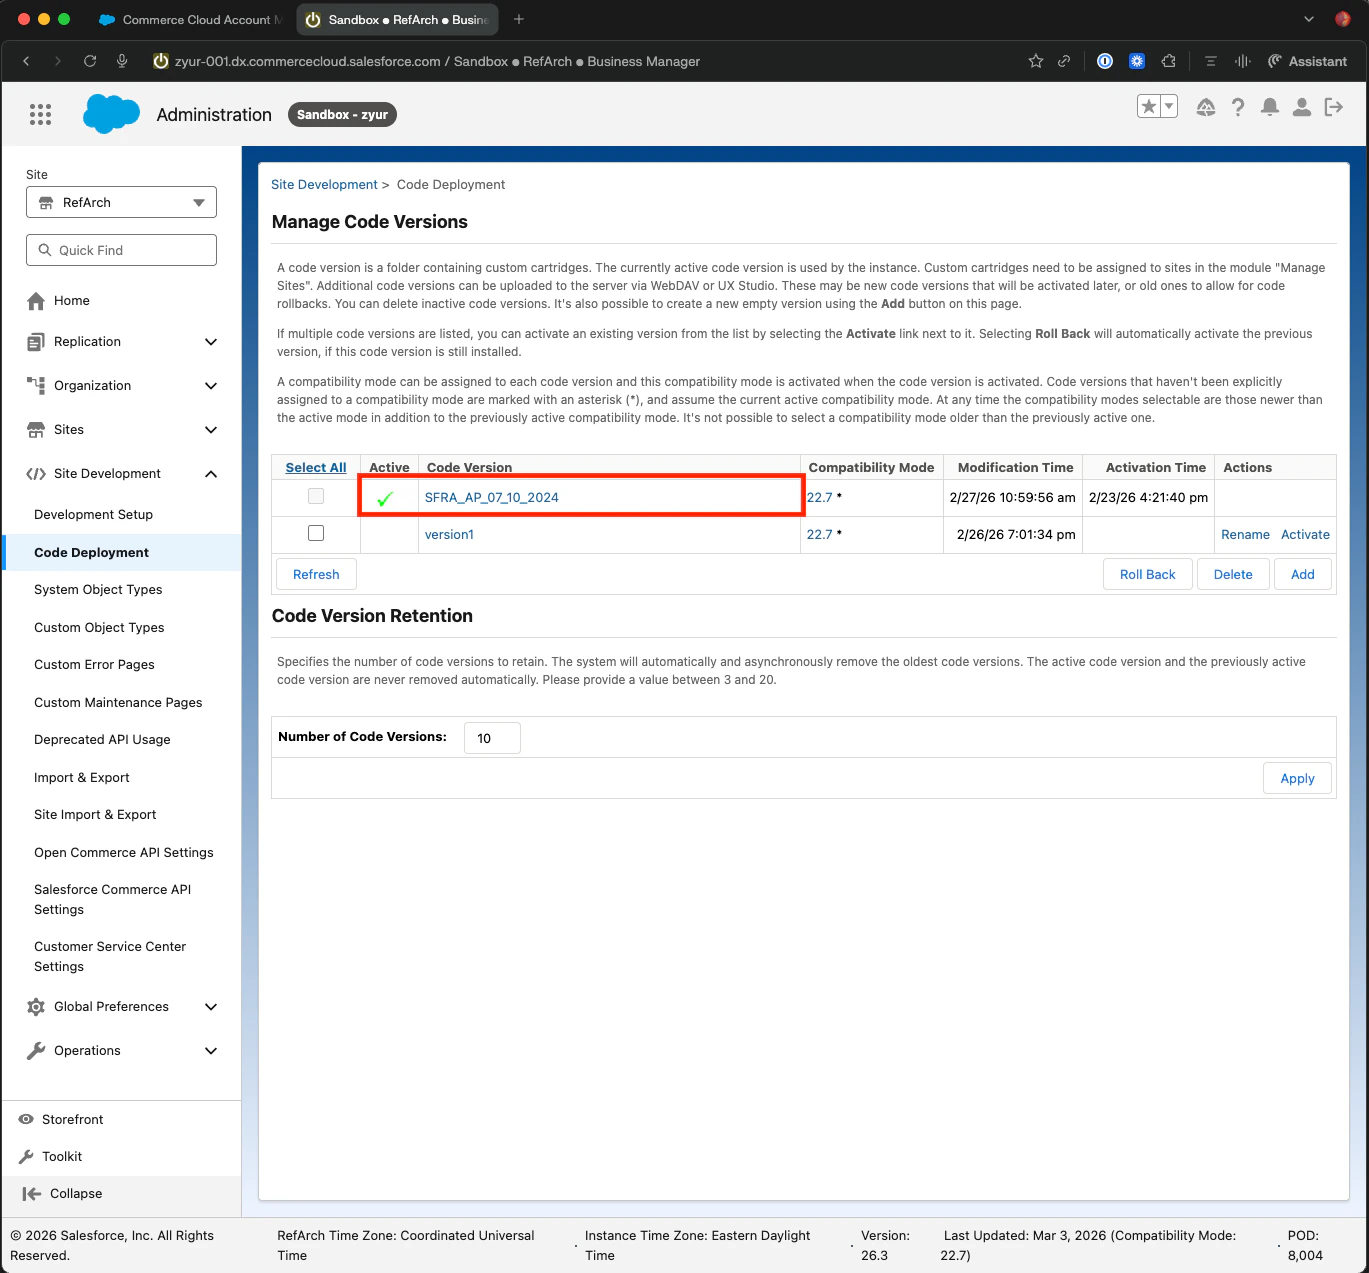
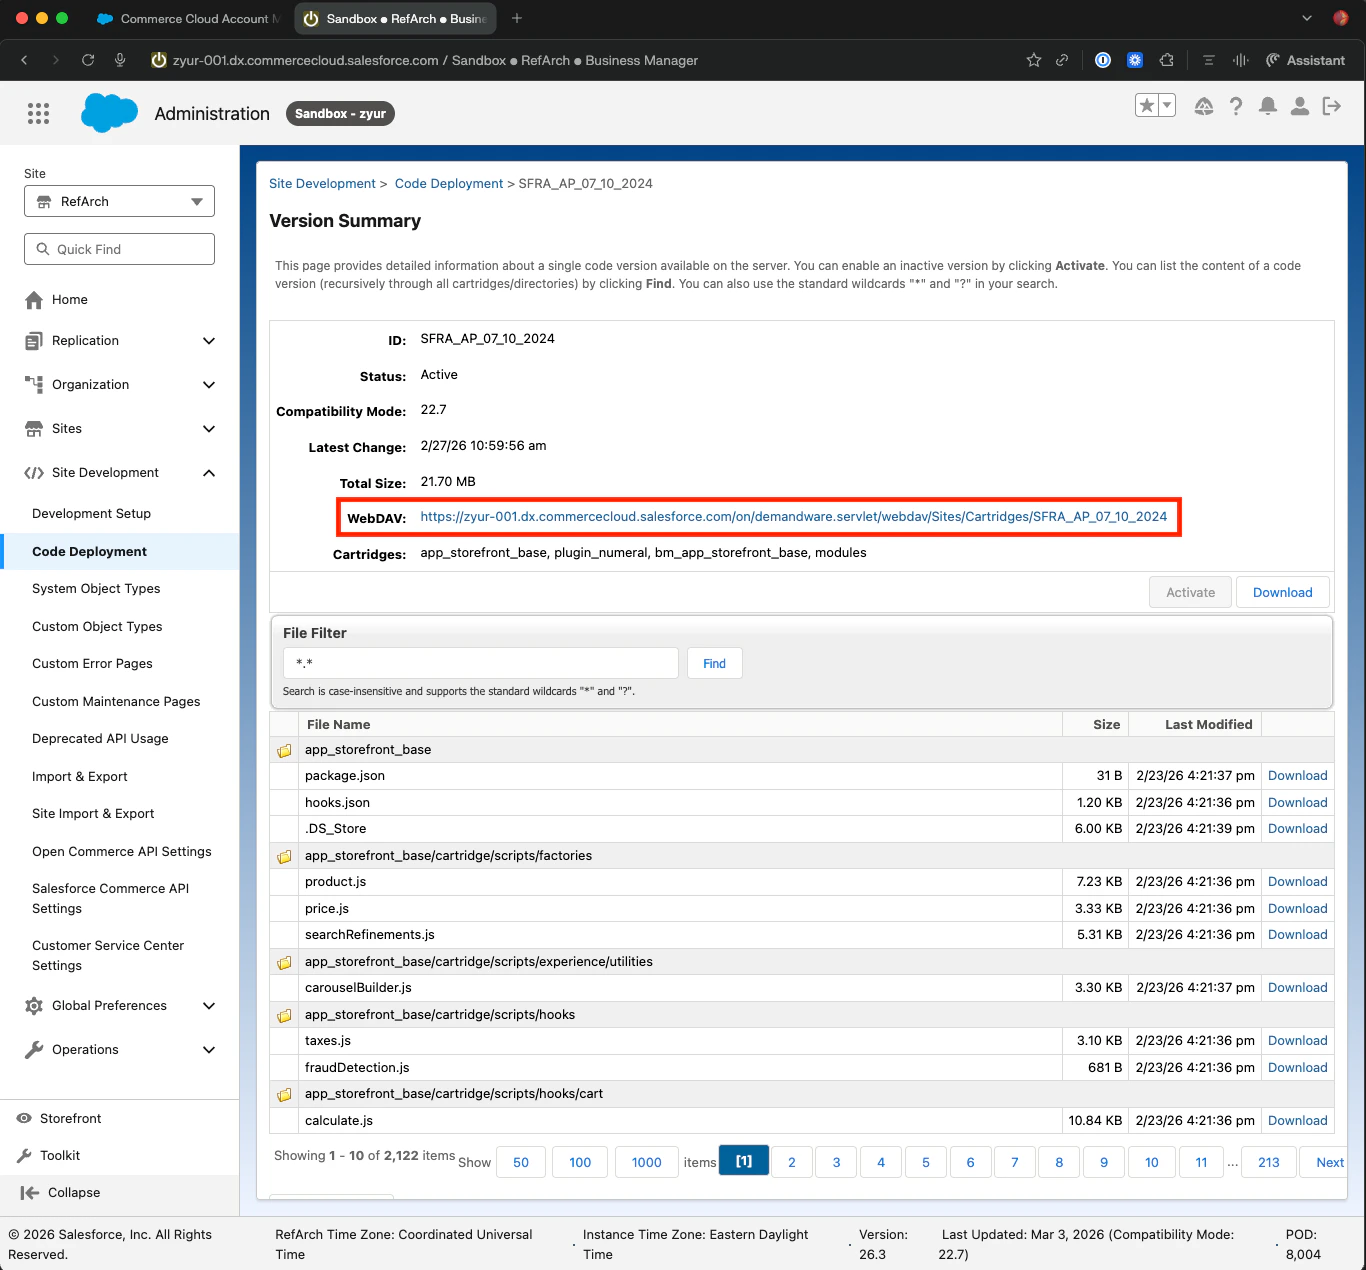
The `plugin_numeral` cartridge is delivered as a zip. You'll upload it to your sandbox via WebDAV. Find your WebDAV URL in Business Manager under **Administration → Site Development → Development Setup**.
***
## Phase 2 — Install the cartridge
### 1. Connect to WebDAV
The `plugin_numeral` cartridge is delivered as a zip. You'll upload it to your sandbox via WebDAV. Find your WebDAV URL in Business Manager under **Administration → Site Development → Development Setup**.
 macOS Finder mounts WebDAV in **read-only** mode. Use [Cyberduck](https://cyberduck.io) (free, macOS/Windows) or another WebDAV client that supports writes.
### 2. Connect with Cyberduck
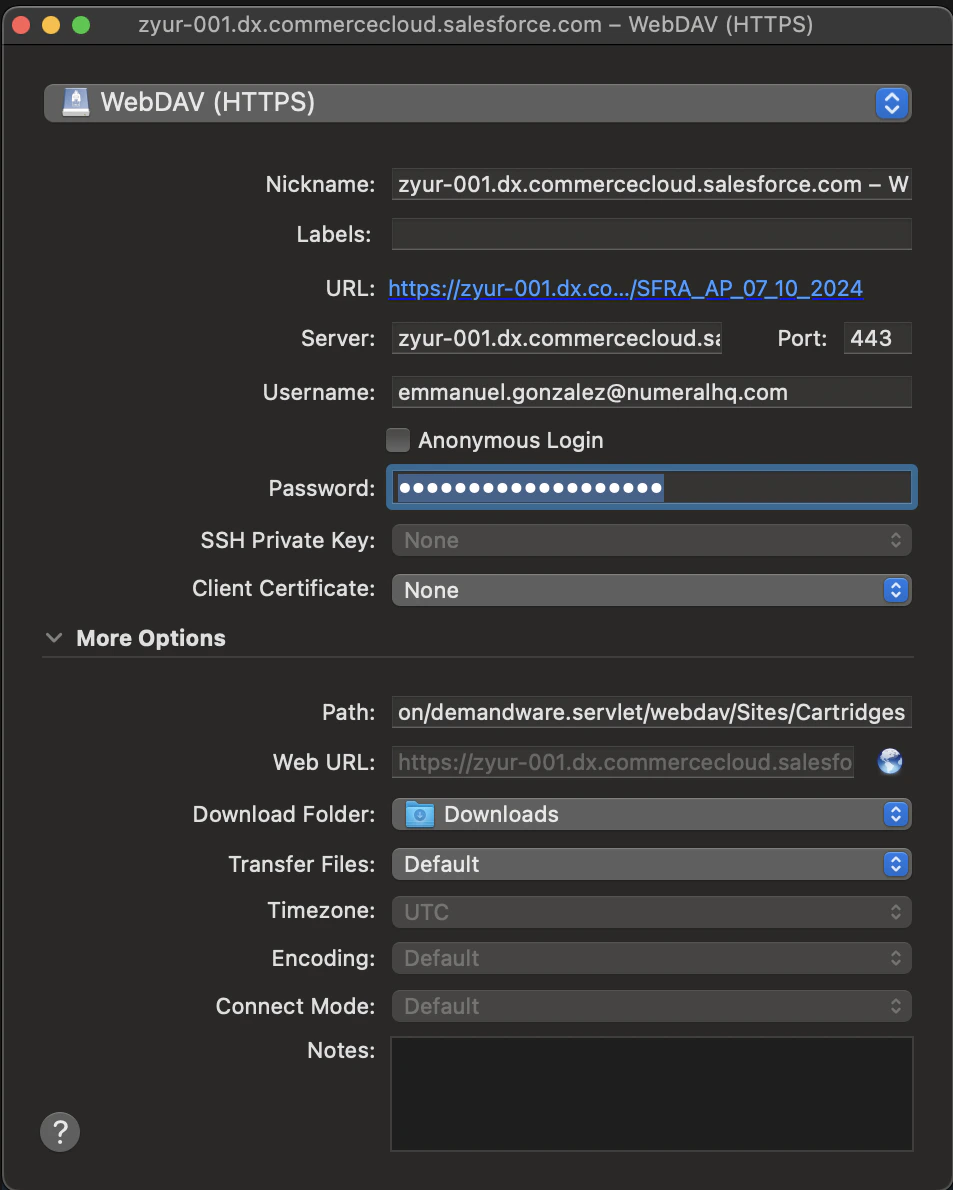
In Cyberduck, create a new bookmark with **WebDAV (HTTPS)**, the host portion of your sandbox URL, and your Business Manager username/password.
macOS Finder mounts WebDAV in **read-only** mode. Use [Cyberduck](https://cyberduck.io) (free, macOS/Windows) or another WebDAV client that supports writes.
### 2. Connect with Cyberduck
In Cyberduck, create a new bookmark with **WebDAV (HTTPS)**, the host portion of your sandbox URL, and your Business Manager username/password.
 ### 3. Upload the cartridge
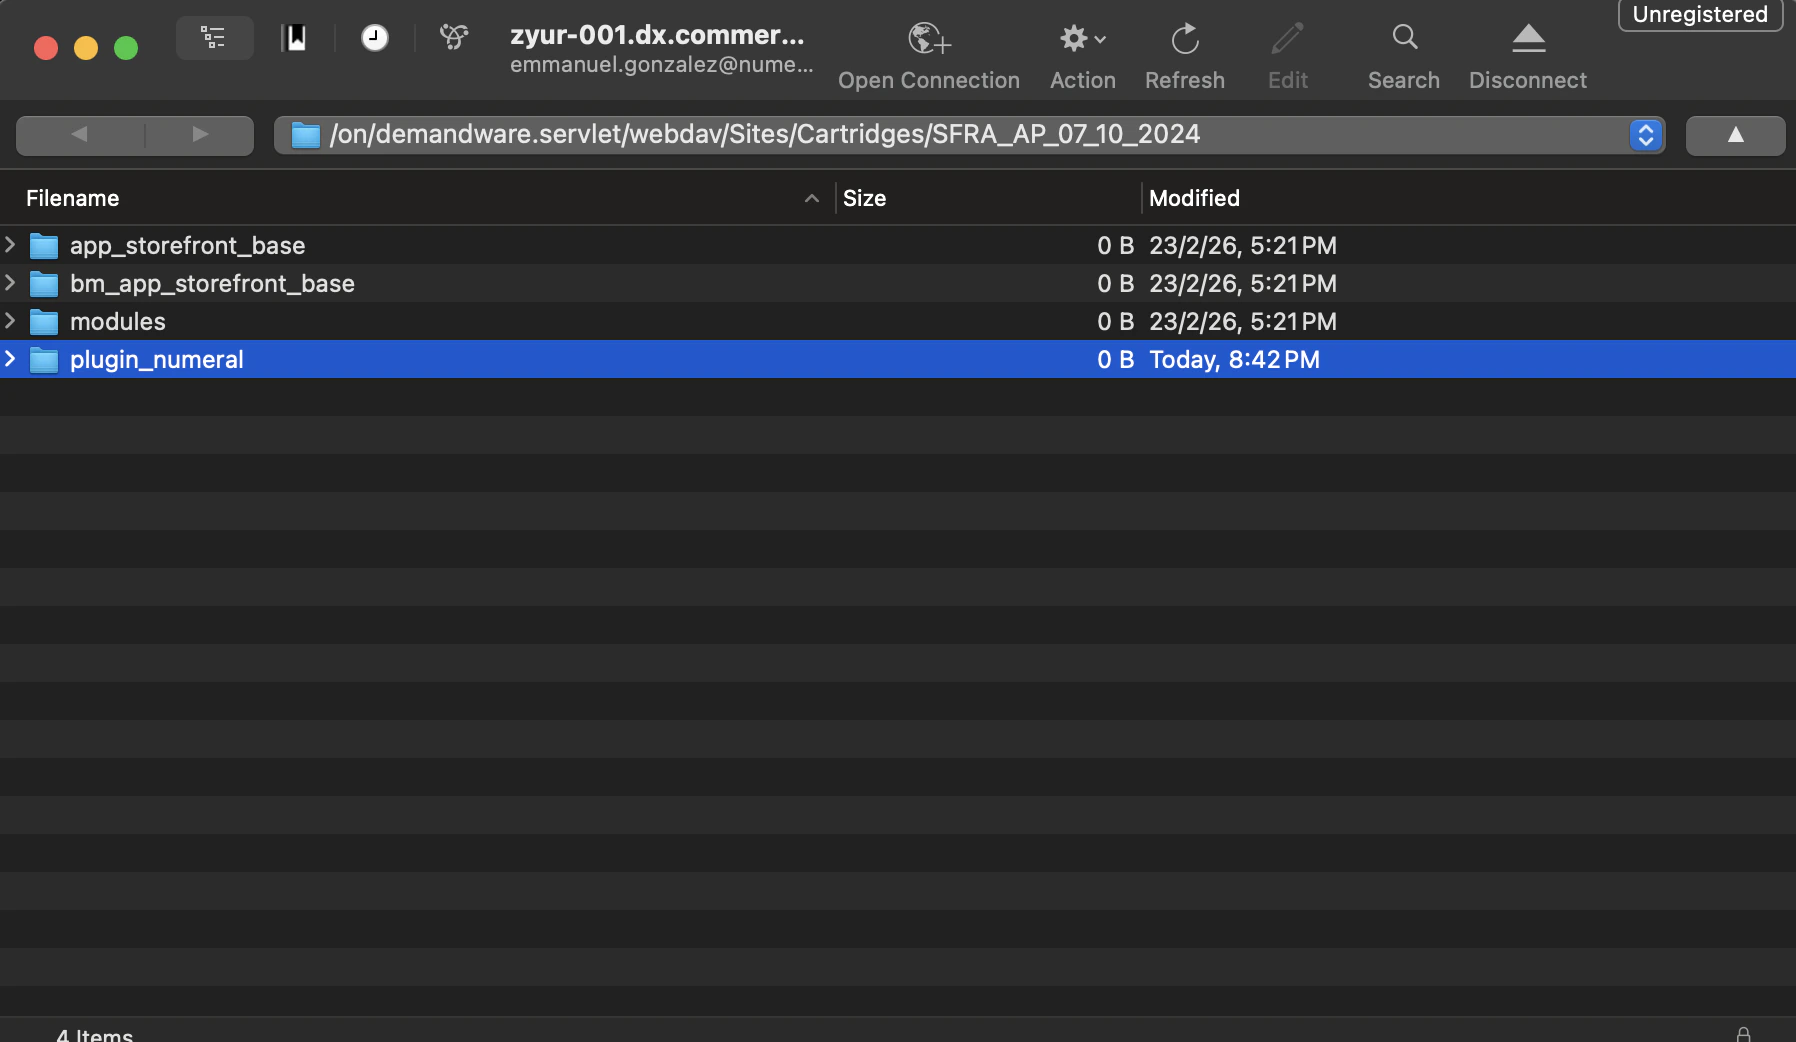
Navigate to `/Cartridges/{your-version-number}/` and upload the `plugin_numeral` folder from the cartridge zip Numeral provided.
### 3. Upload the cartridge
Navigate to `/Cartridges/{your-version-number}/` and upload the `plugin_numeral` folder from the cartridge zip Numeral provided.
 ### 4. Update the cartridge path
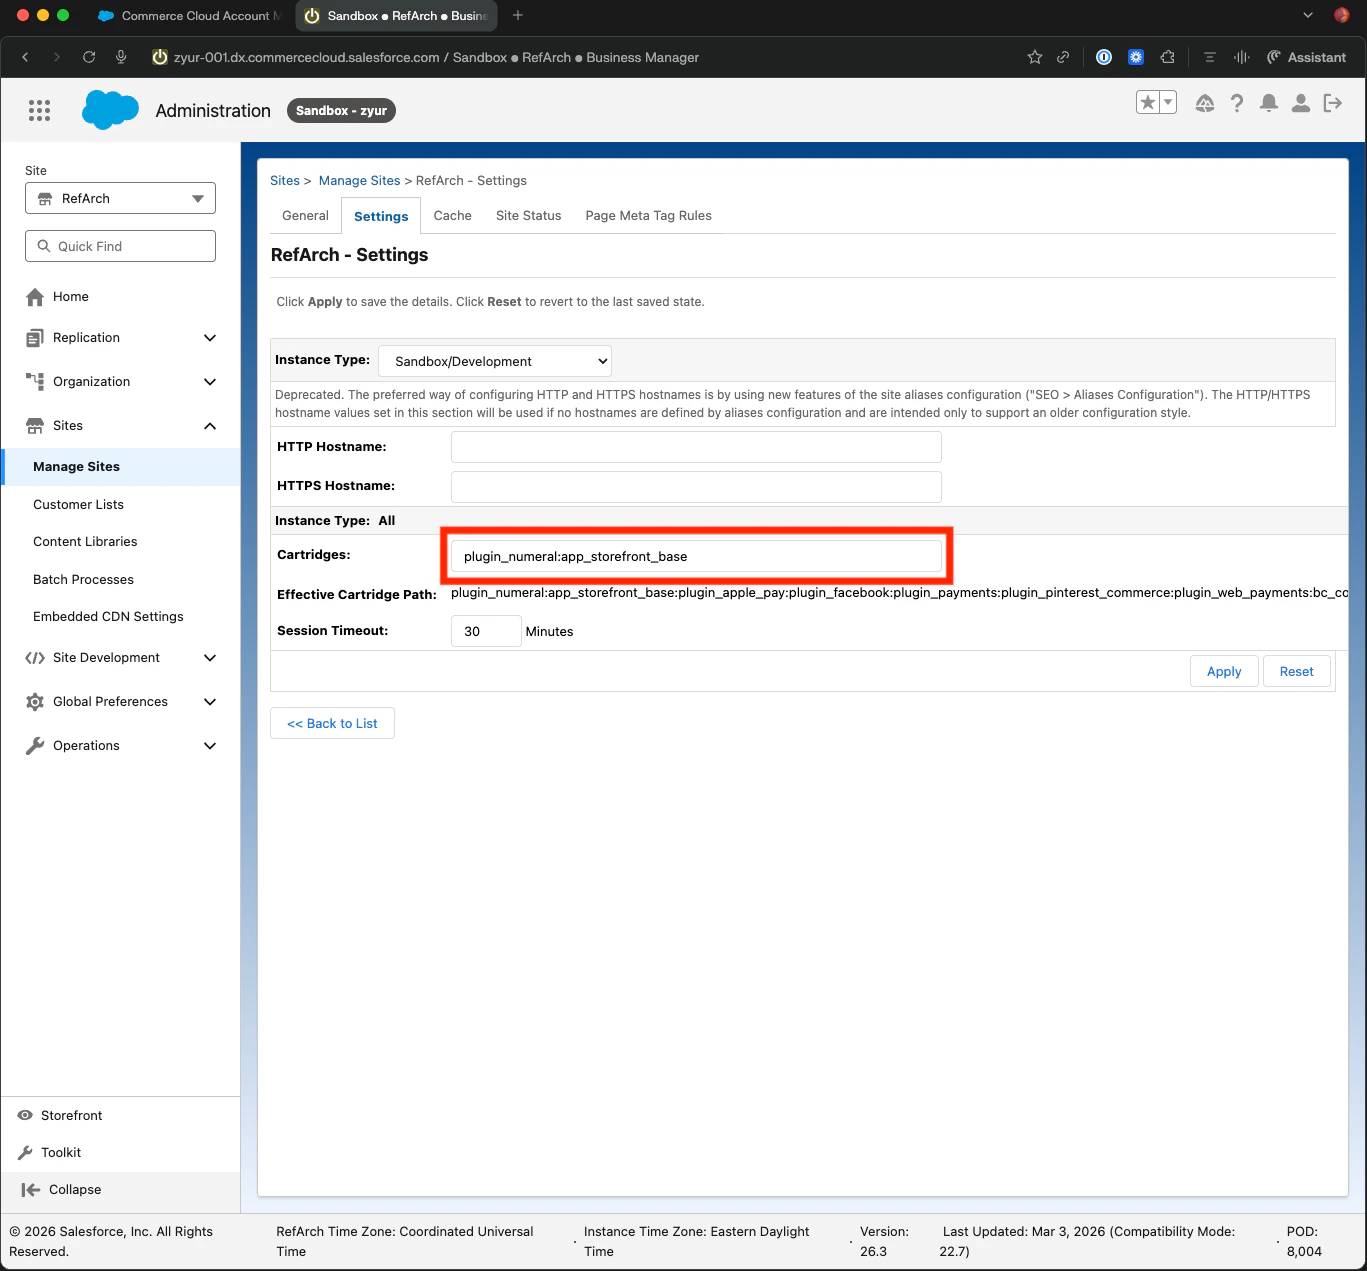
In Business Manager → **Administration → Sites → Manage Sites → `{your site}` → Settings**, prepend `plugin_numeral` to the **Cartridges** path so it loads first:
```text theme={null}
plugin_numeral:app_storefront_base:...
```
`plugin_numeral` must appear **before** `app_storefront_base` in the cartridge path. If it appears later, the storefront will not invoke Numeral's checkout hooks.
### 4. Update the cartridge path
In Business Manager → **Administration → Sites → Manage Sites → `{your site}` → Settings**, prepend `plugin_numeral` to the **Cartridges** path so it loads first:
```text theme={null}
plugin_numeral:app_storefront_base:...
```
`plugin_numeral` must appear **before** `app_storefront_base` in the cartridge path. If it appears later, the storefront will not invoke Numeral's checkout hooks.
 ### 5. Import the metadata
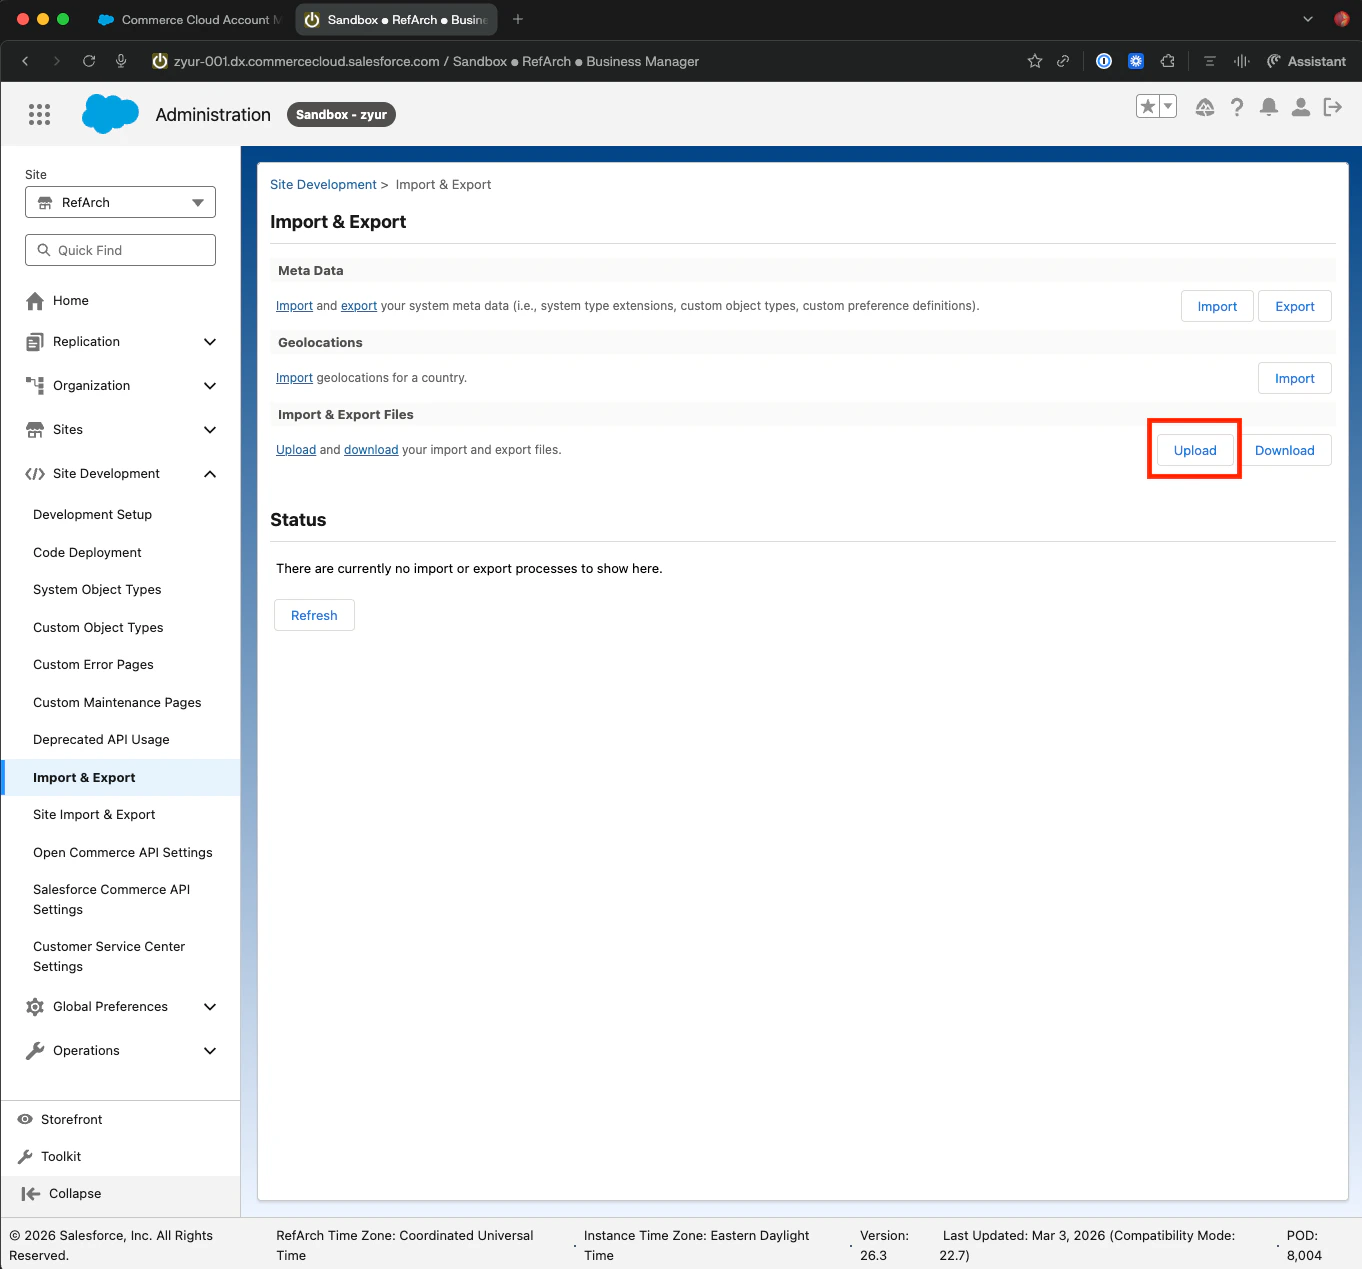
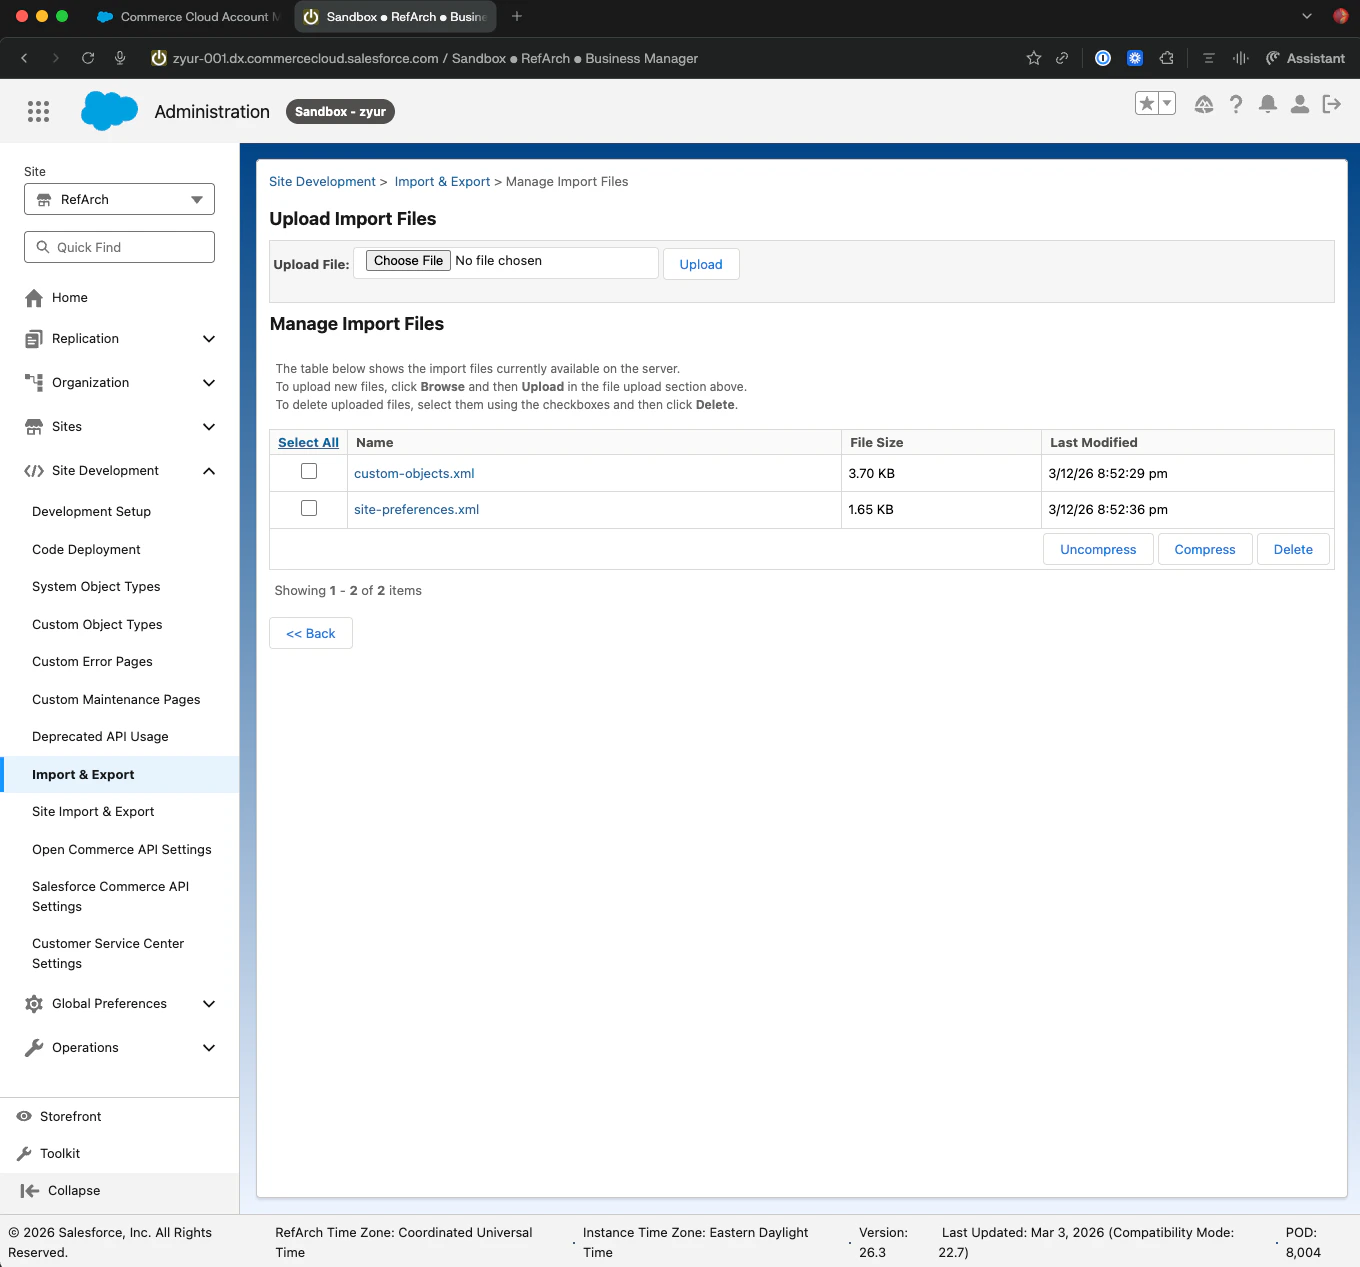
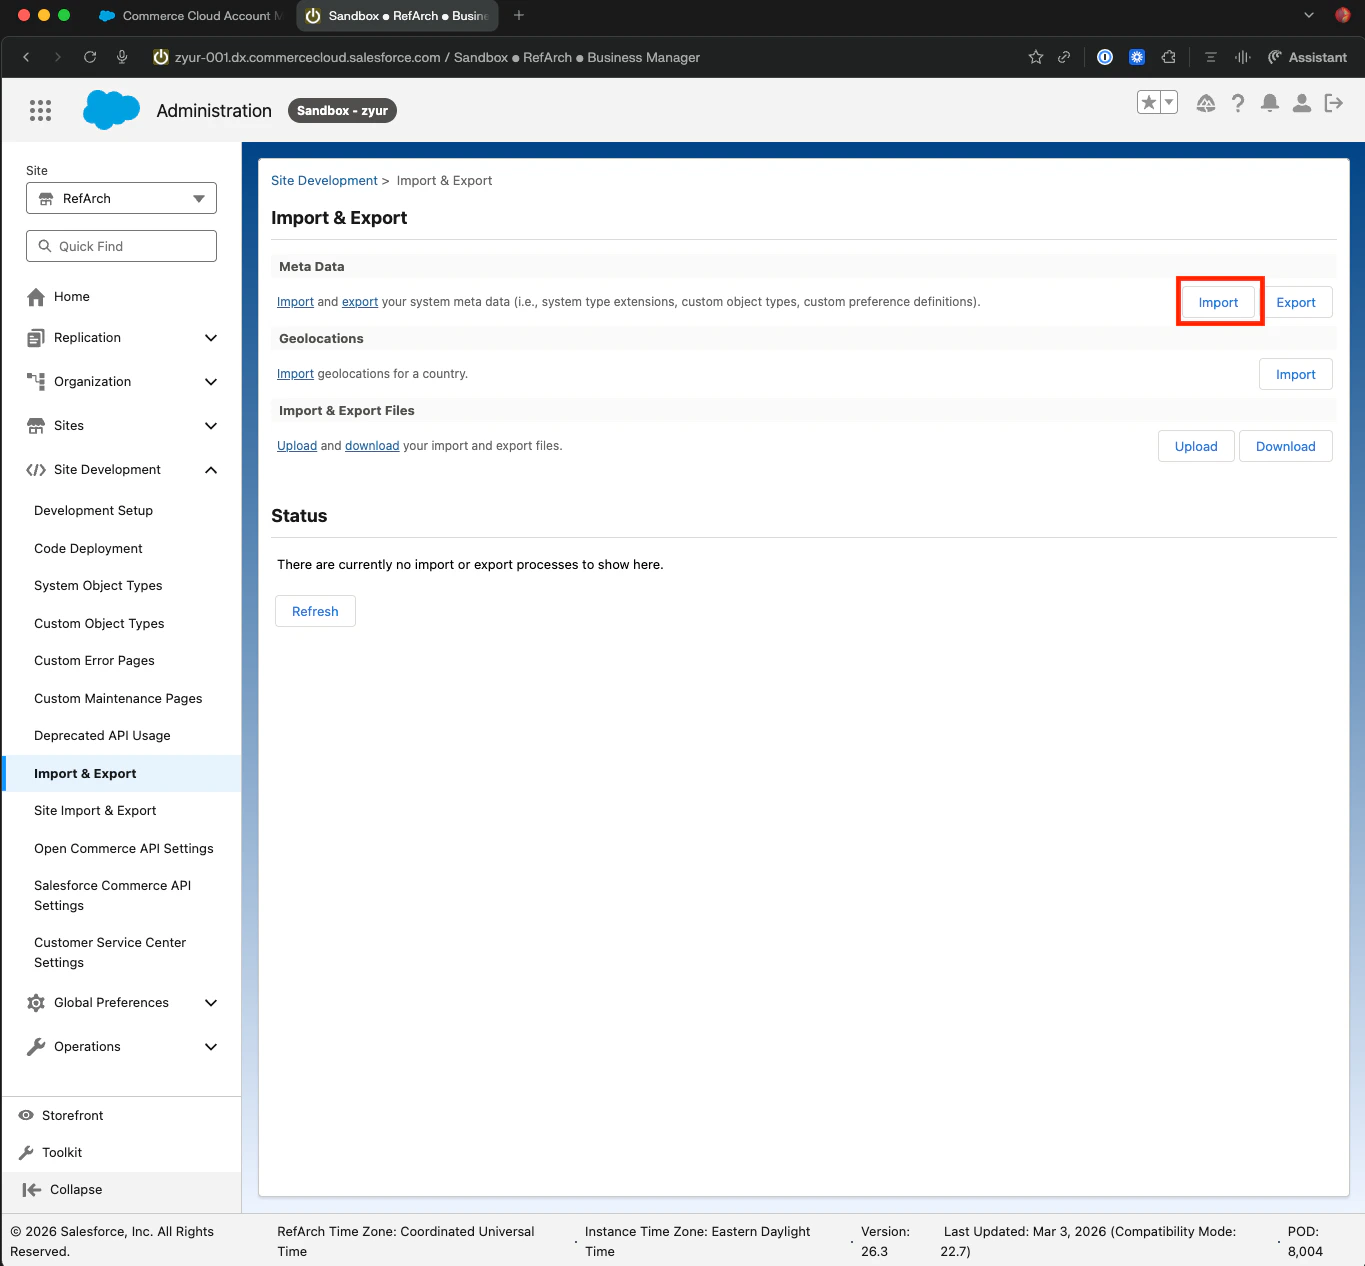
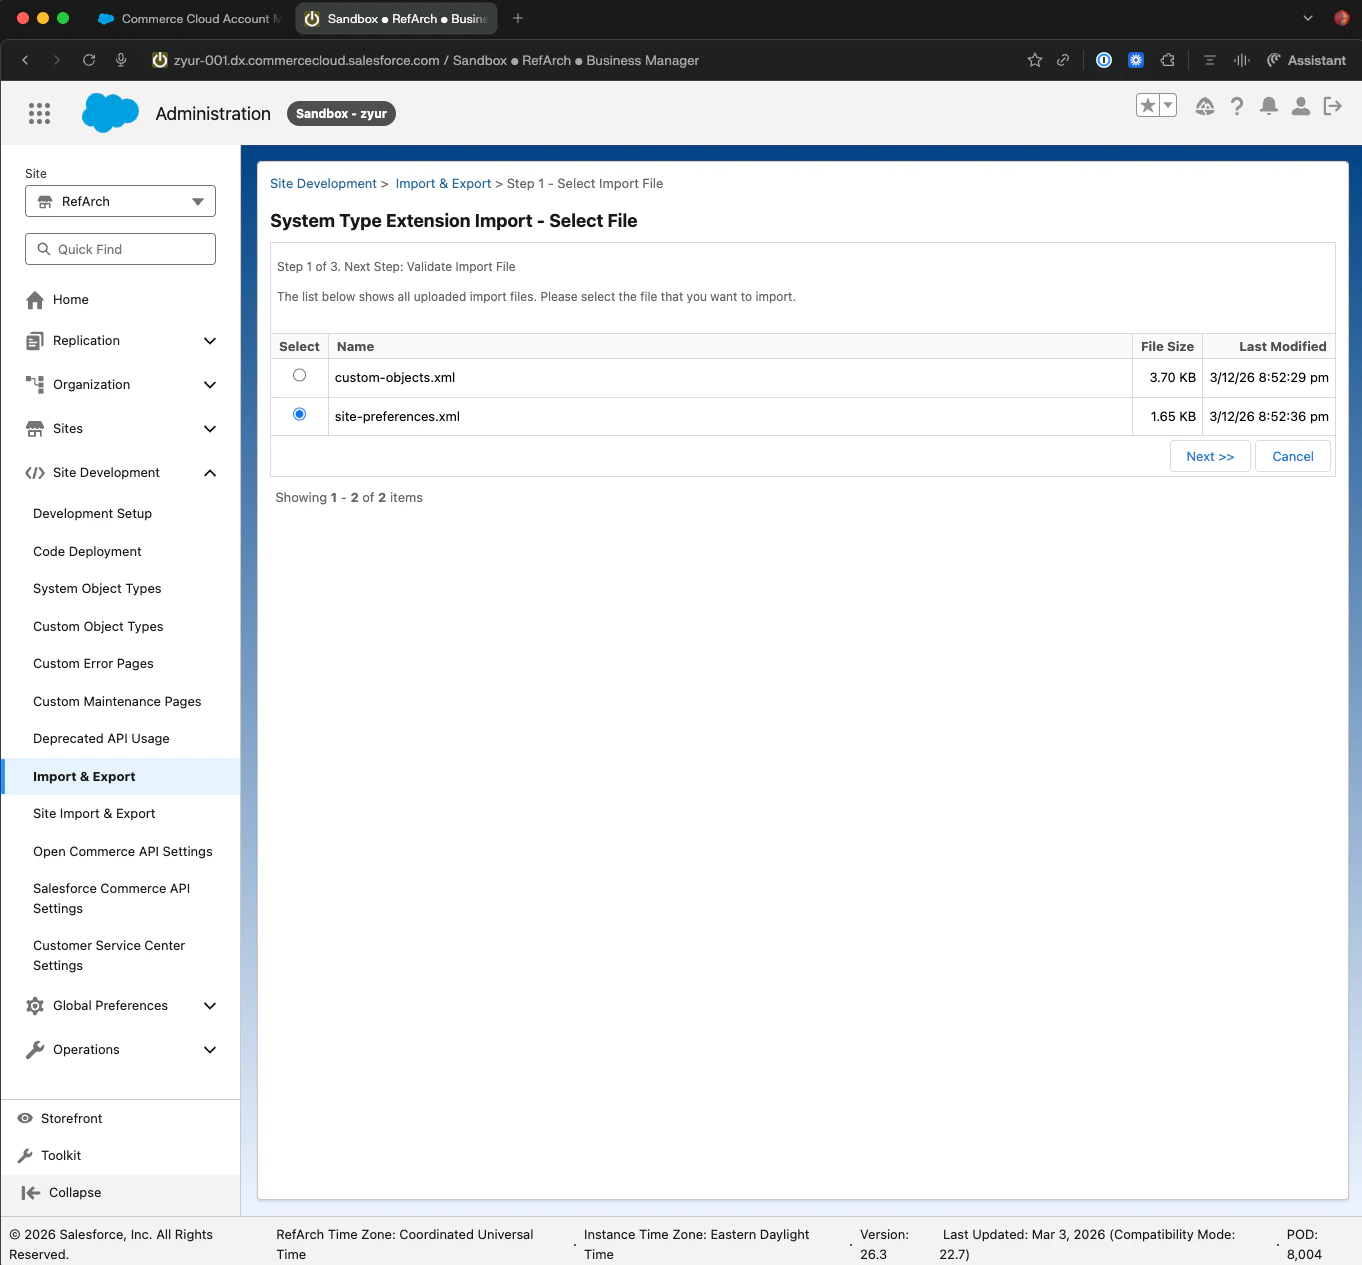
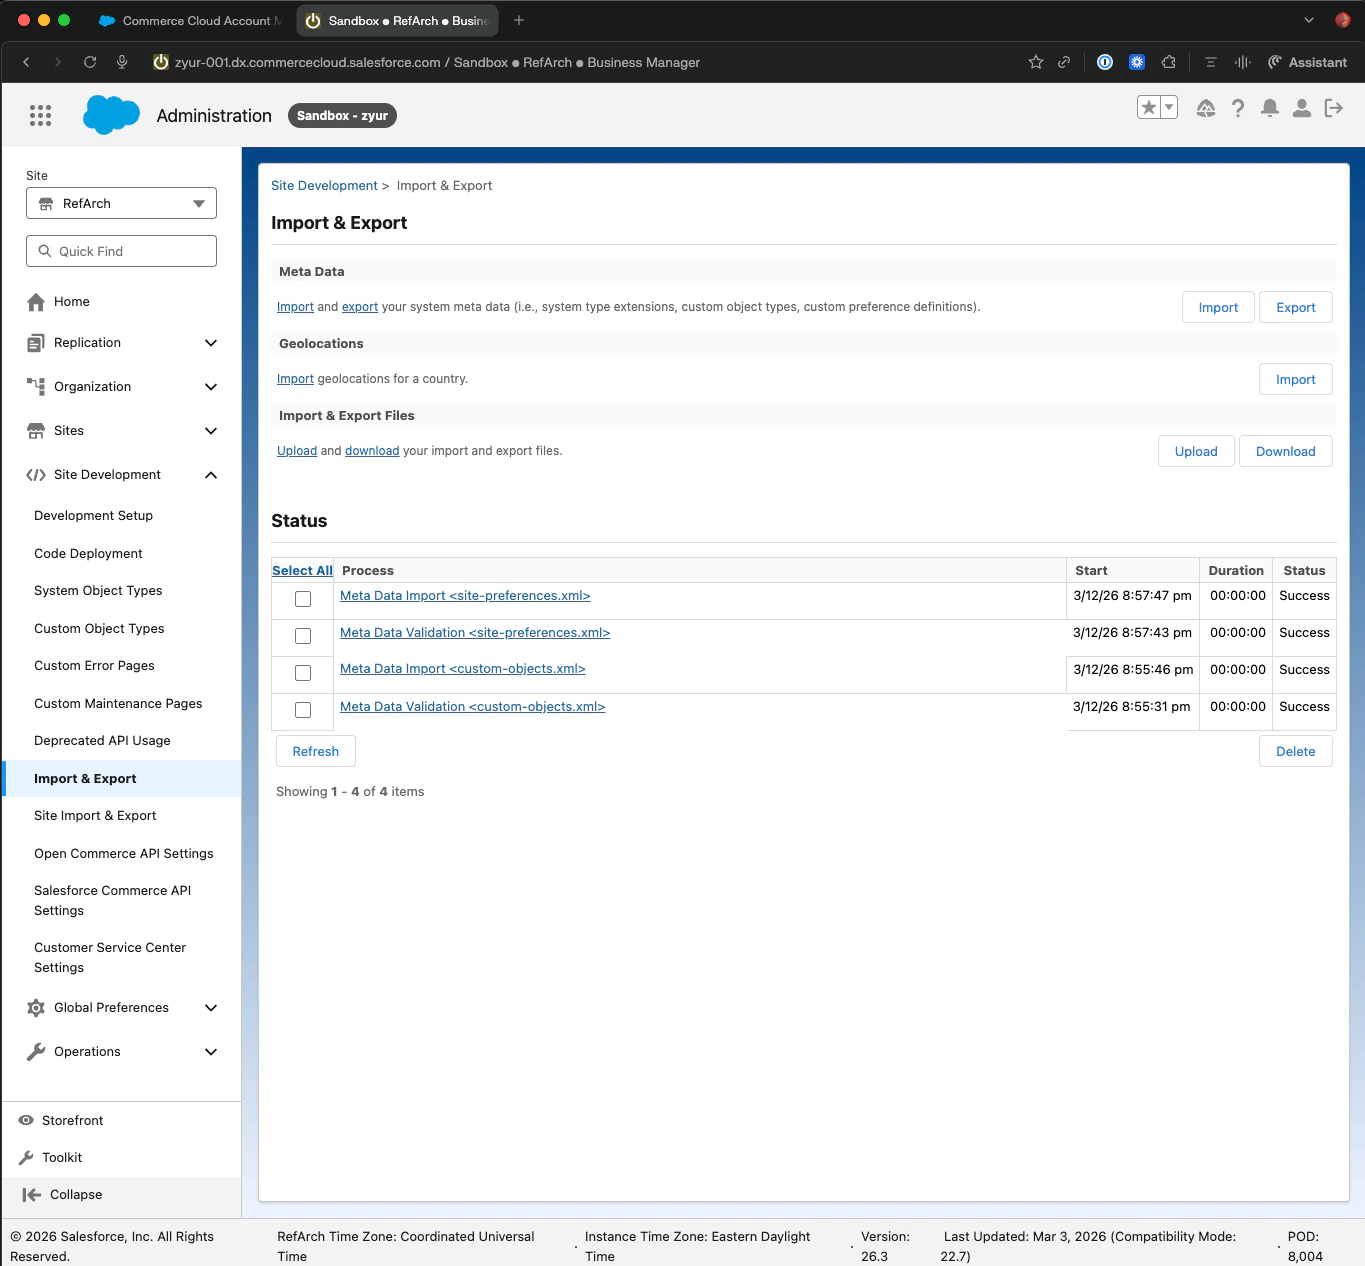
The cartridge zip includes two metadata files: `site-preferences.xml` and `custom-objects.xml`. Import both via **Administration → Site Development → Site Import & Export**.
### 5. Import the metadata
The cartridge zip includes two metadata files: `site-preferences.xml` and `custom-objects.xml`. Import both via **Administration → Site Development → Site Import & Export**.
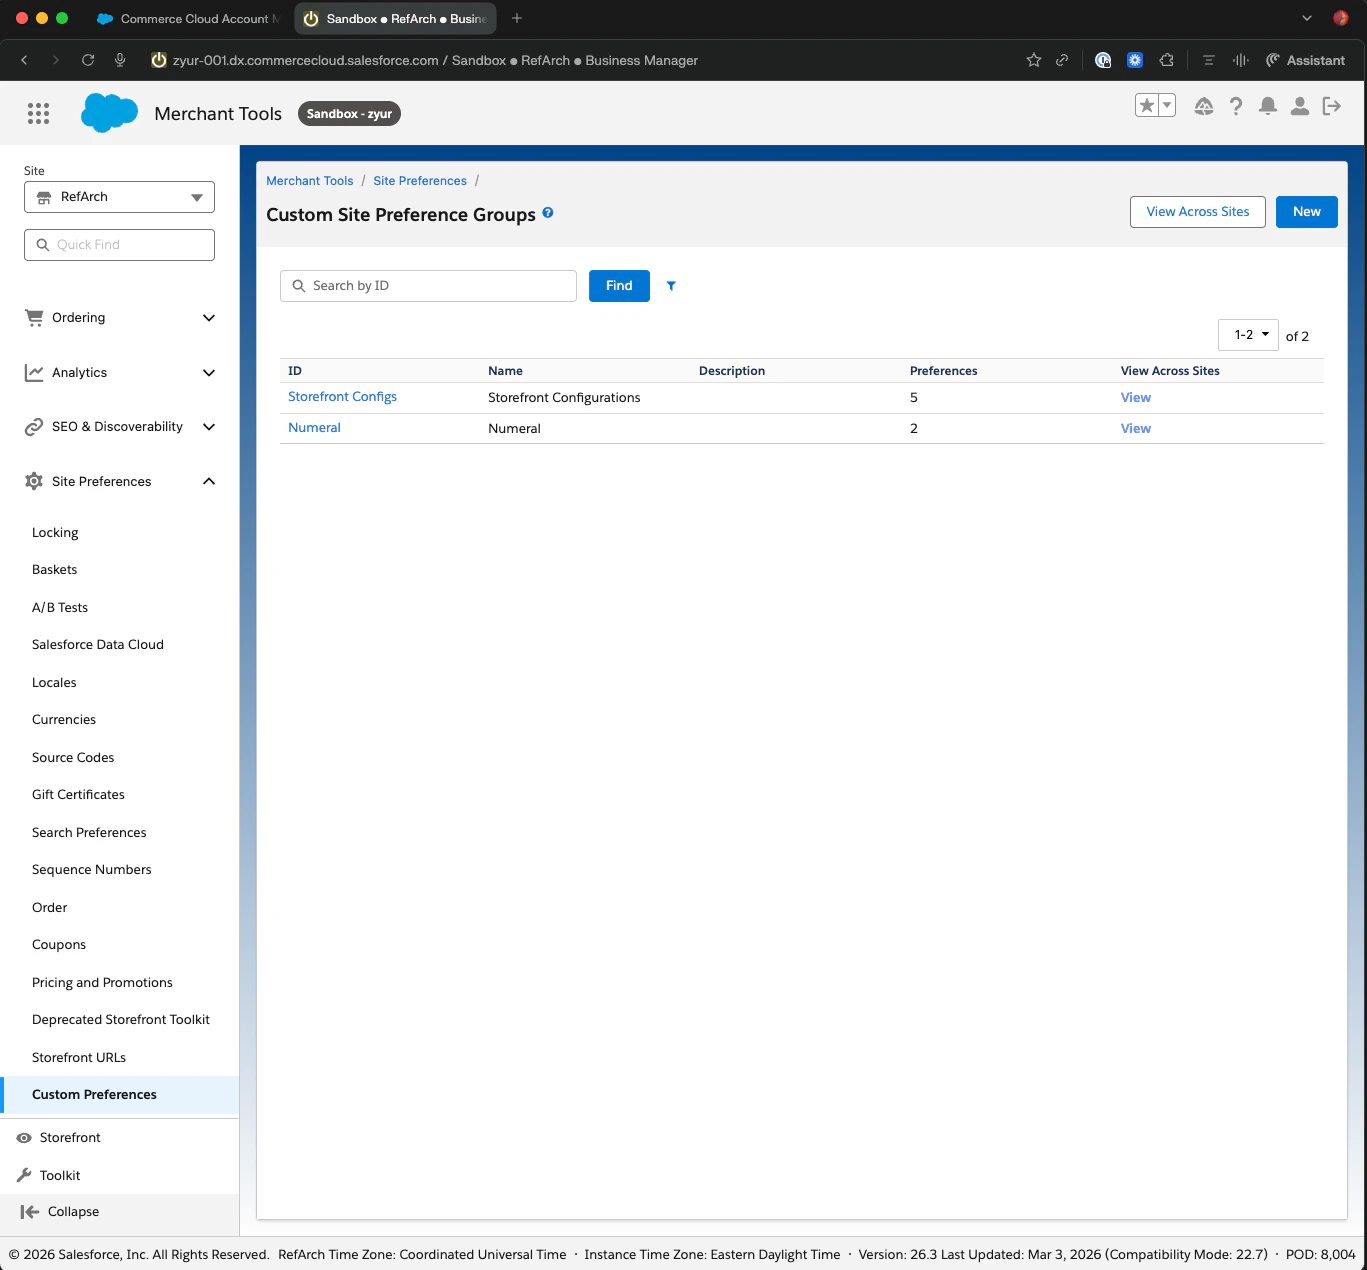
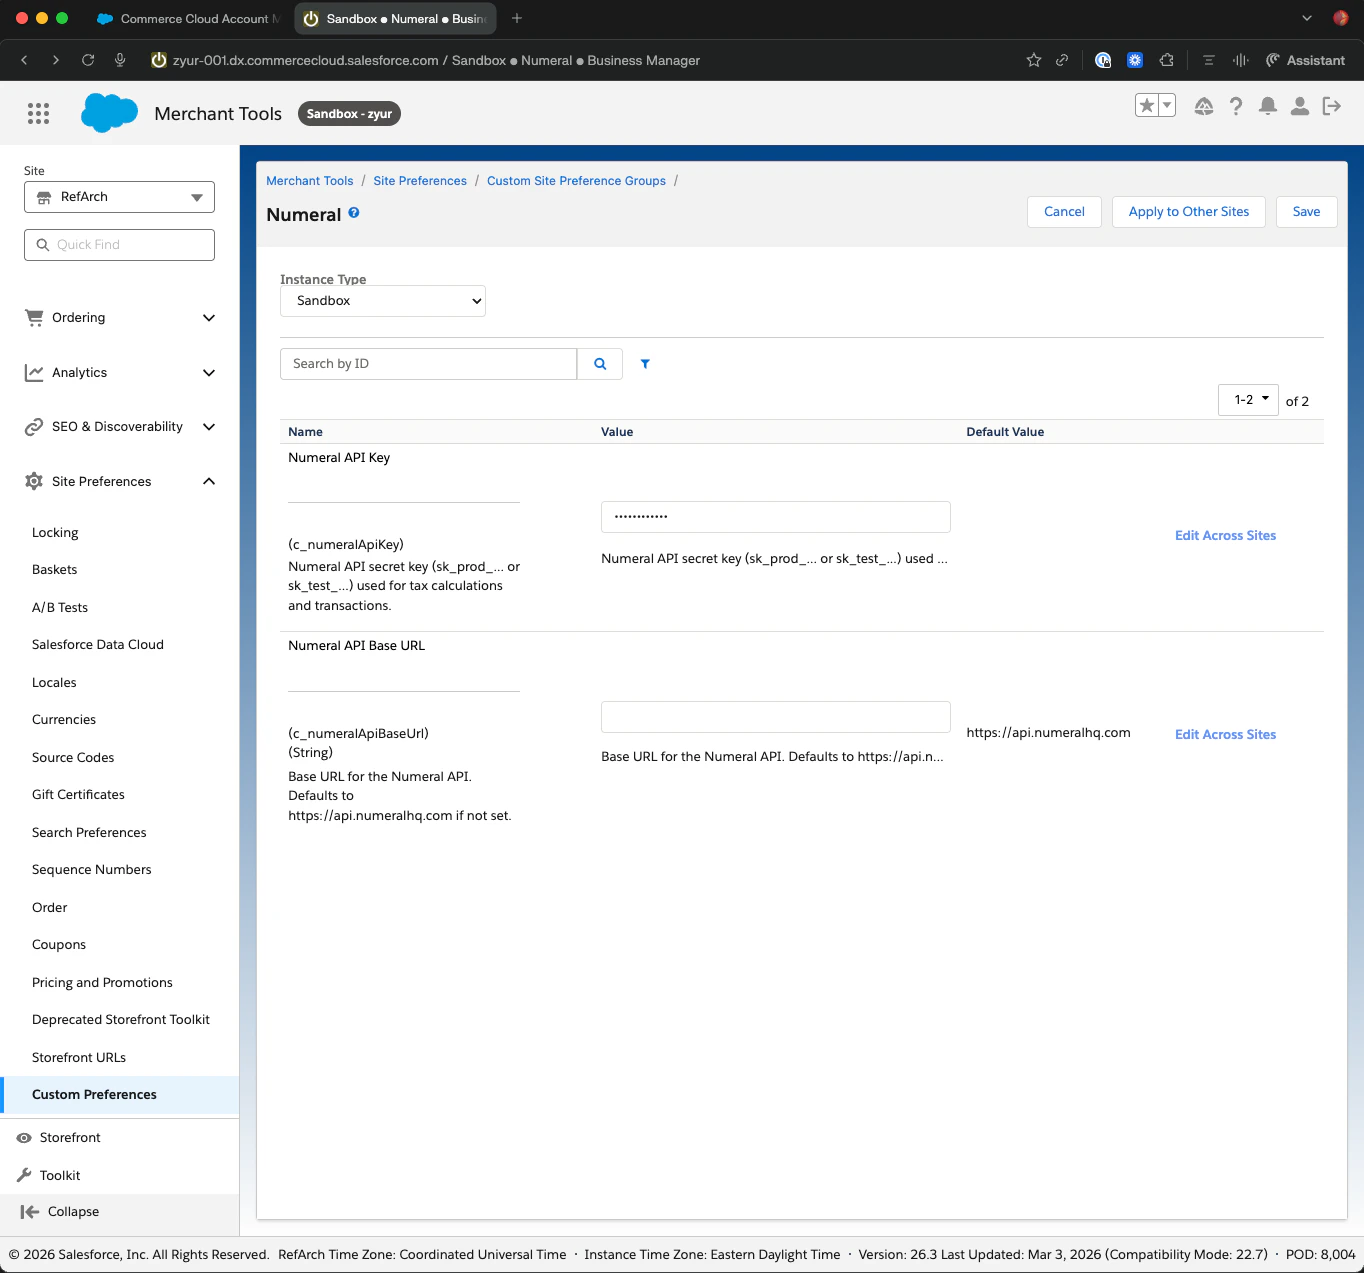
 The import creates the following site preferences:
| Preference | Purpose |
| --------------------- | ------------------------------------------------------- |
| `c_numeralApiKey` | Your Numeral API key |
| `c_numeralApiBaseUrl` | Numeral API base URL (e.g. `https://api.numeralhq.com`) |
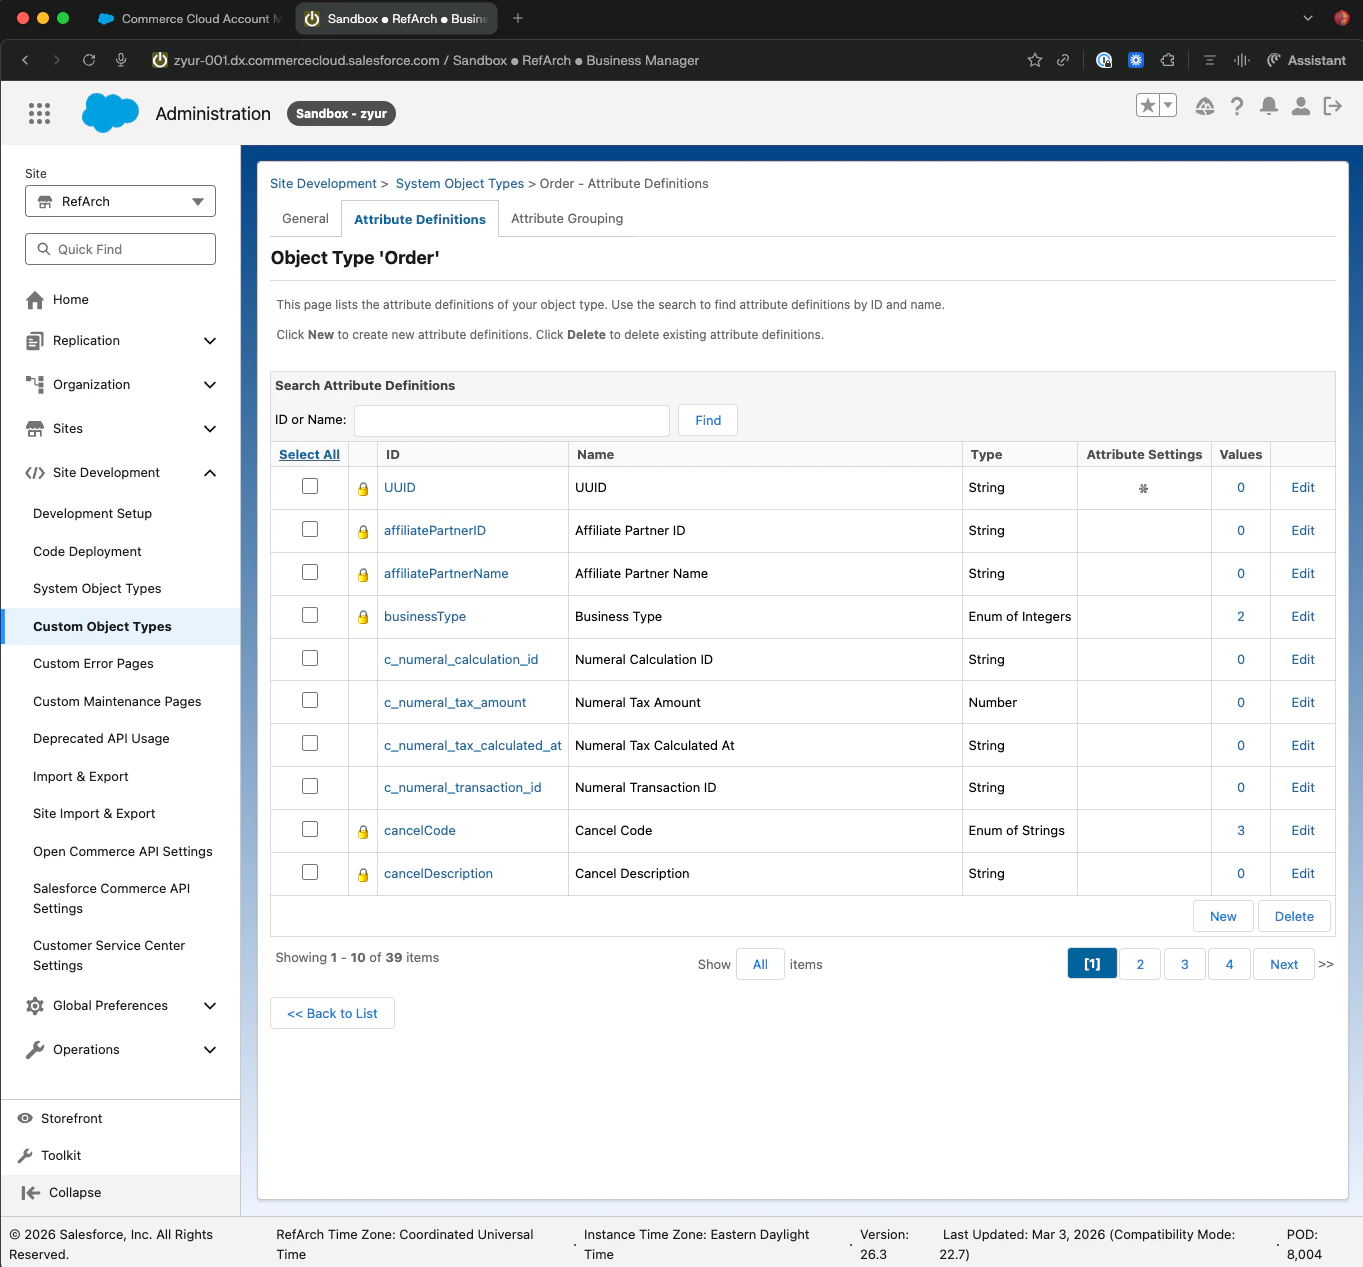
And these custom attributes on the **Order** system object:
* `c_numeral_tax_amount`
* `c_numeral_calculation_id`
* `c_numeral_transaction_id`
* `c_numeral_tax_calculated_at`
The import creates the following site preferences:
| Preference | Purpose |
| --------------------- | ------------------------------------------------------- |
| `c_numeralApiKey` | Your Numeral API key |
| `c_numeralApiBaseUrl` | Numeral API base URL (e.g. `https://api.numeralhq.com`) |
And these custom attributes on the **Order** system object:
* `c_numeral_tax_amount`
* `c_numeral_calculation_id`
* `c_numeral_transaction_id`
* `c_numeral_tax_calculated_at`
 ***
## Phase 3 — Connect to Numeral
### 1. Configure the API key in SFCC
Set `c_numeralApiKey` and `c_numeralApiBaseUrl` under **Merchant Tools → Site Preferences → Custom Preferences → Numeral**.
***
## Phase 3 — Connect to Numeral
### 1. Configure the API key in SFCC
Set `c_numeralApiKey` and `c_numeralApiBaseUrl` under **Merchant Tools → Site Preferences → Custom Preferences → Numeral**.
 ### 2. Run a quick checkout test
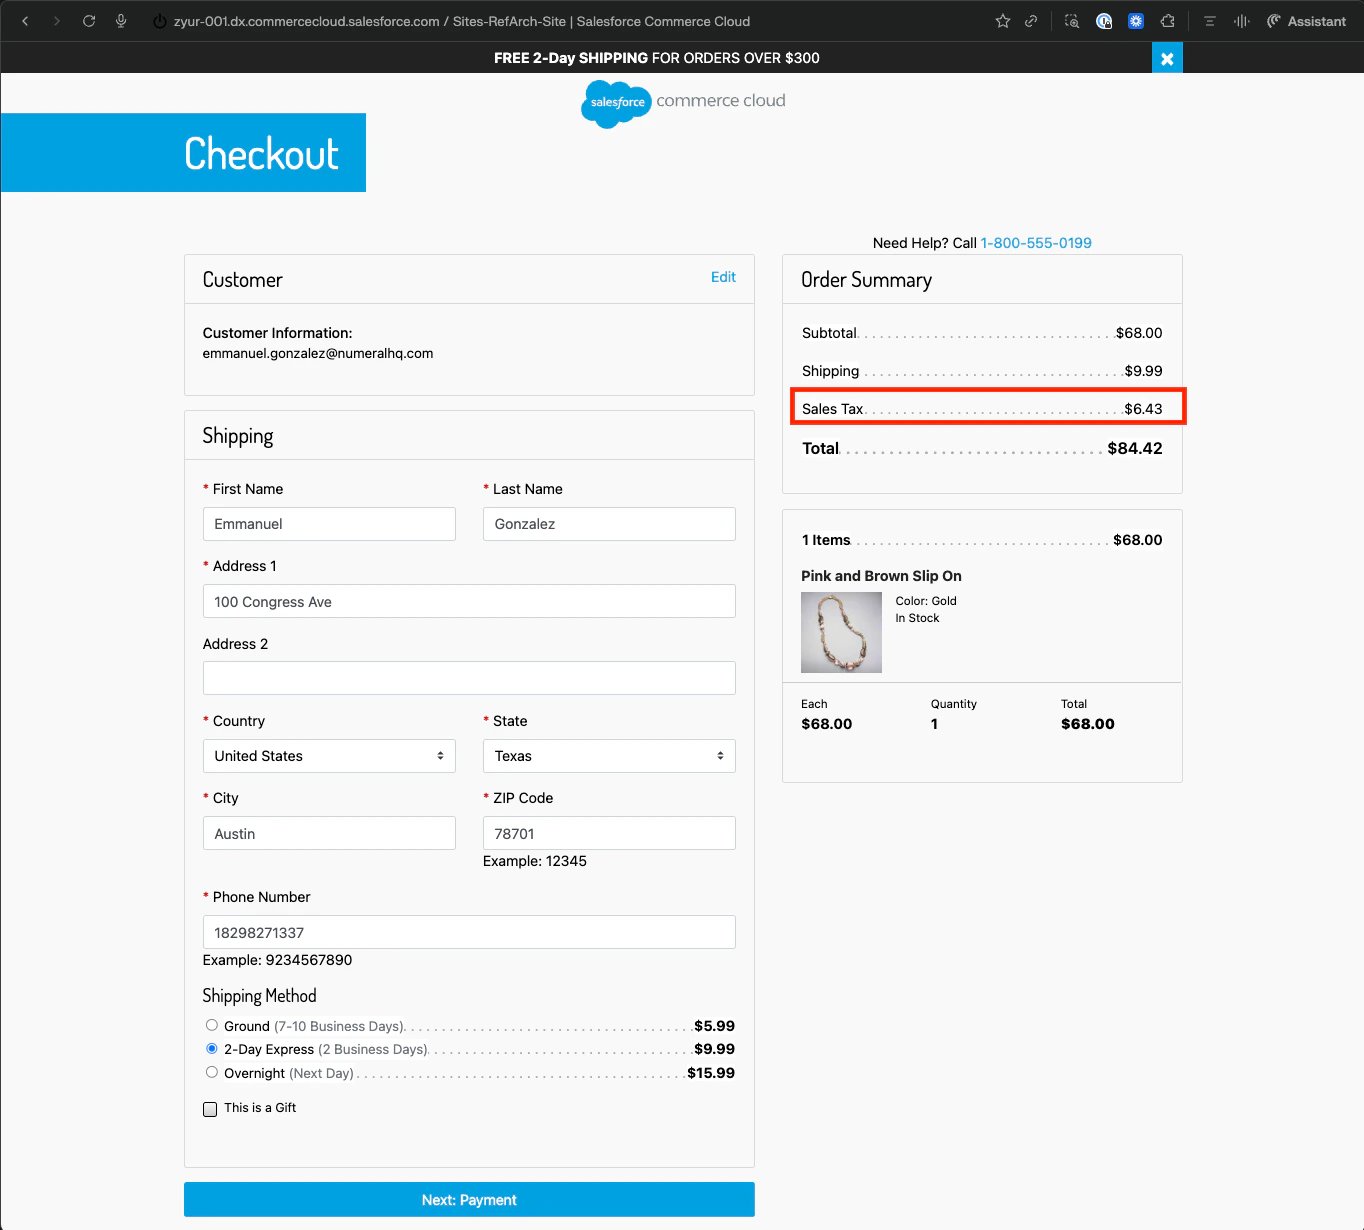
Place a test order on your sandbox storefront. Confirm tax appears on the order summary.
### 2. Run a quick checkout test
Place a test order on your sandbox storefront. Confirm tax appears on the order summary.
 ### 3. Inspect the logs
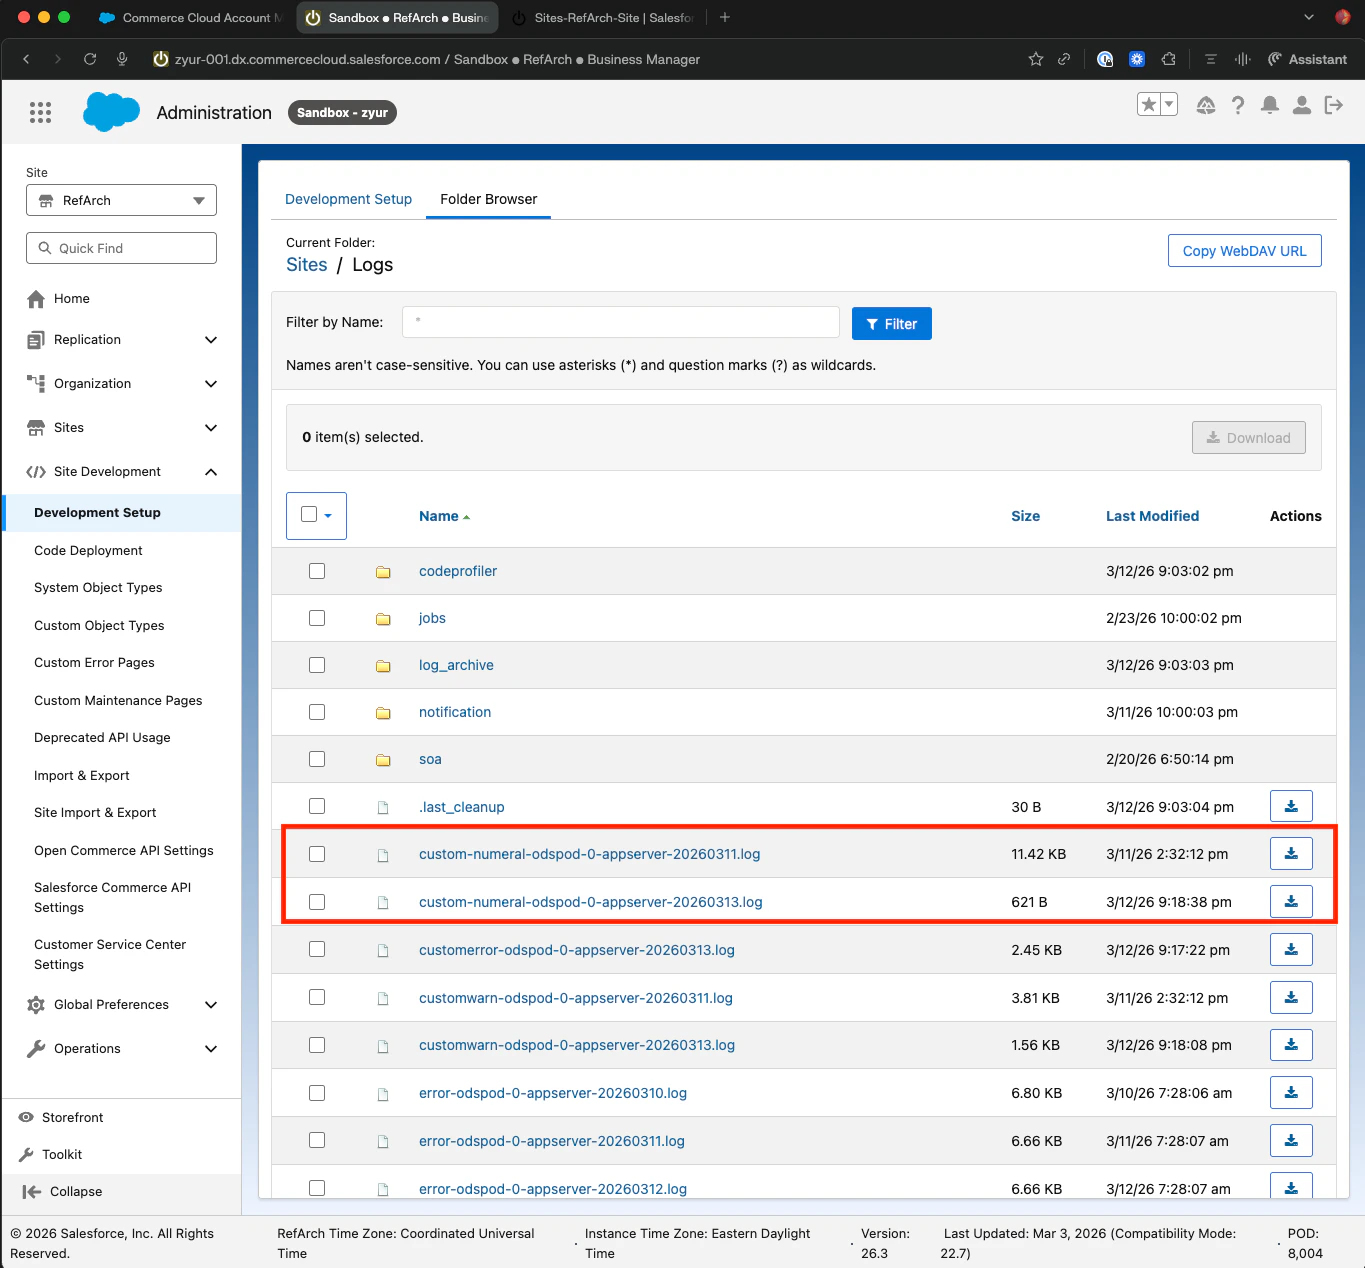
In Business Manager, go to **Administration → Site Development → Custom Log Settings** to view the Numeral request and response payloads. Confirm there are no errors.
### 3. Inspect the logs
In Business Manager, go to **Administration → Site Development → Custom Log Settings** to view the Numeral request and response payloads. Confirm there are no errors.
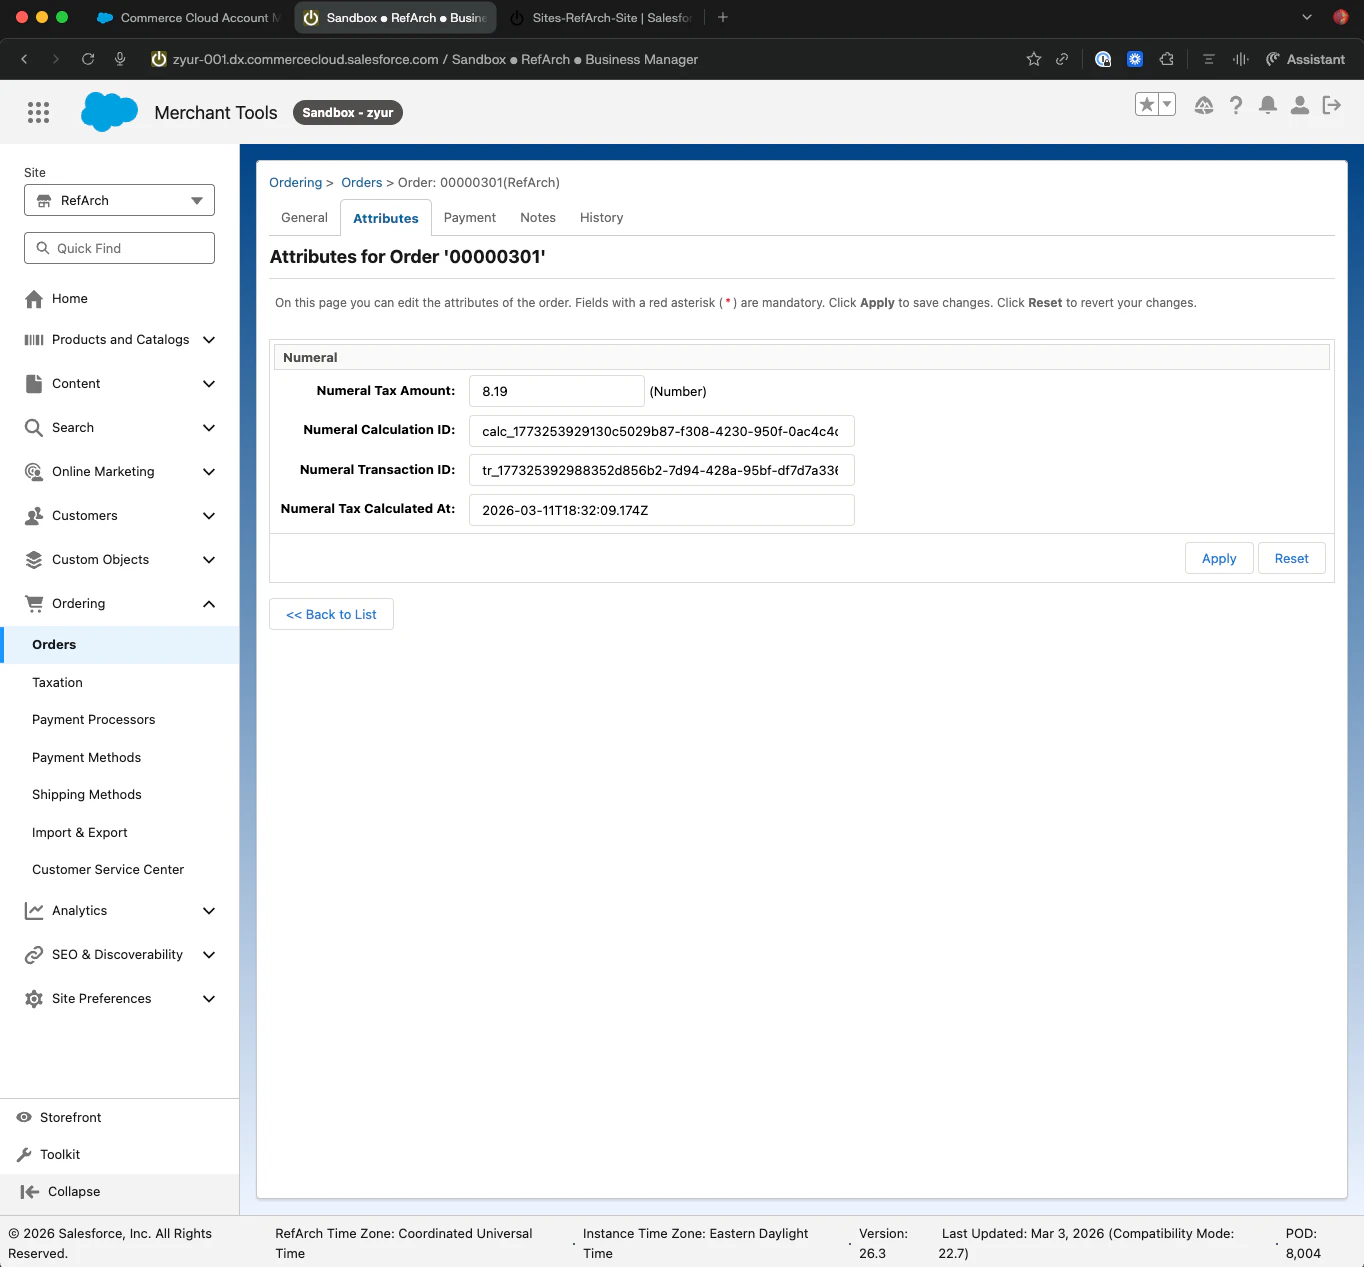
 ### 4. Verify the order's custom attributes
Open the order in Business Manager and confirm the four `c_numeral_*` custom attributes are populated.
### 4. Verify the order's custom attributes
Open the order in Business Manager and confirm the four `c_numeral_*` custom attributes are populated.
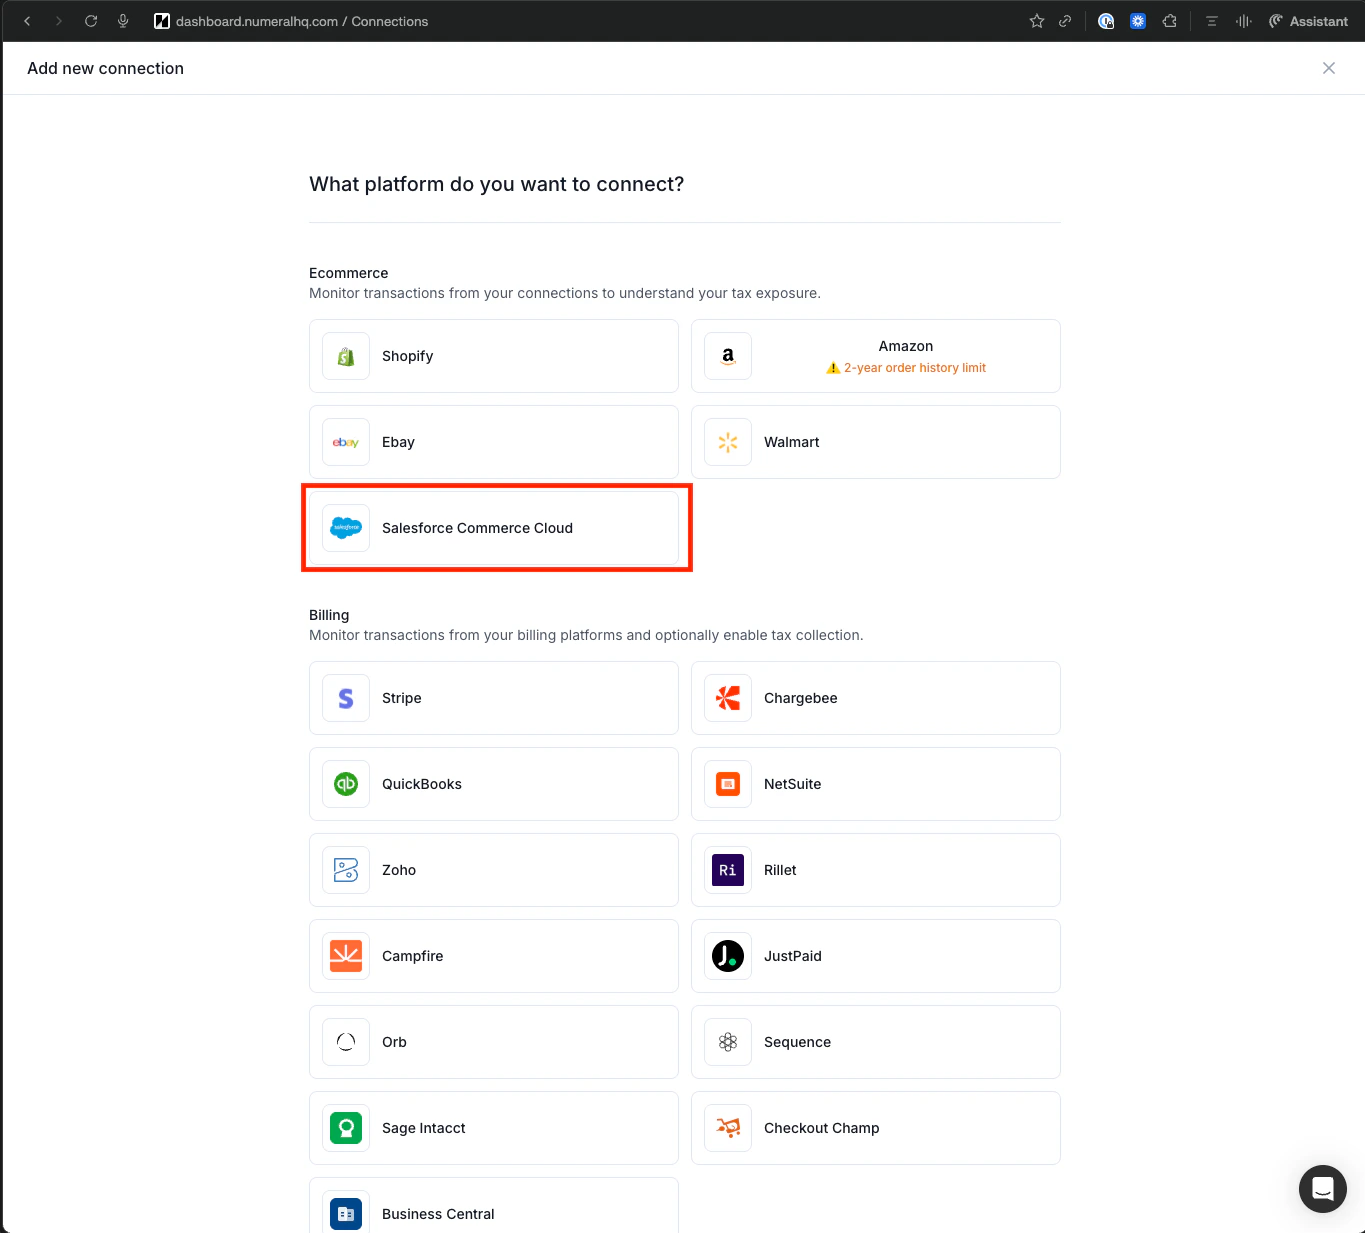
 ### 5. Add the connection in Numeral
In your Numeral dashboard under **Settings → Integrations → Salesforce Commerce Cloud**, click **Add Connection** and provide the seven values you captured in Phase 1.
### 5. Add the connection in Numeral
In your Numeral dashboard under **Settings → Integrations → Salesforce Commerce Cloud**, click **Add Connection** and provide the seven values you captured in Phase 1.
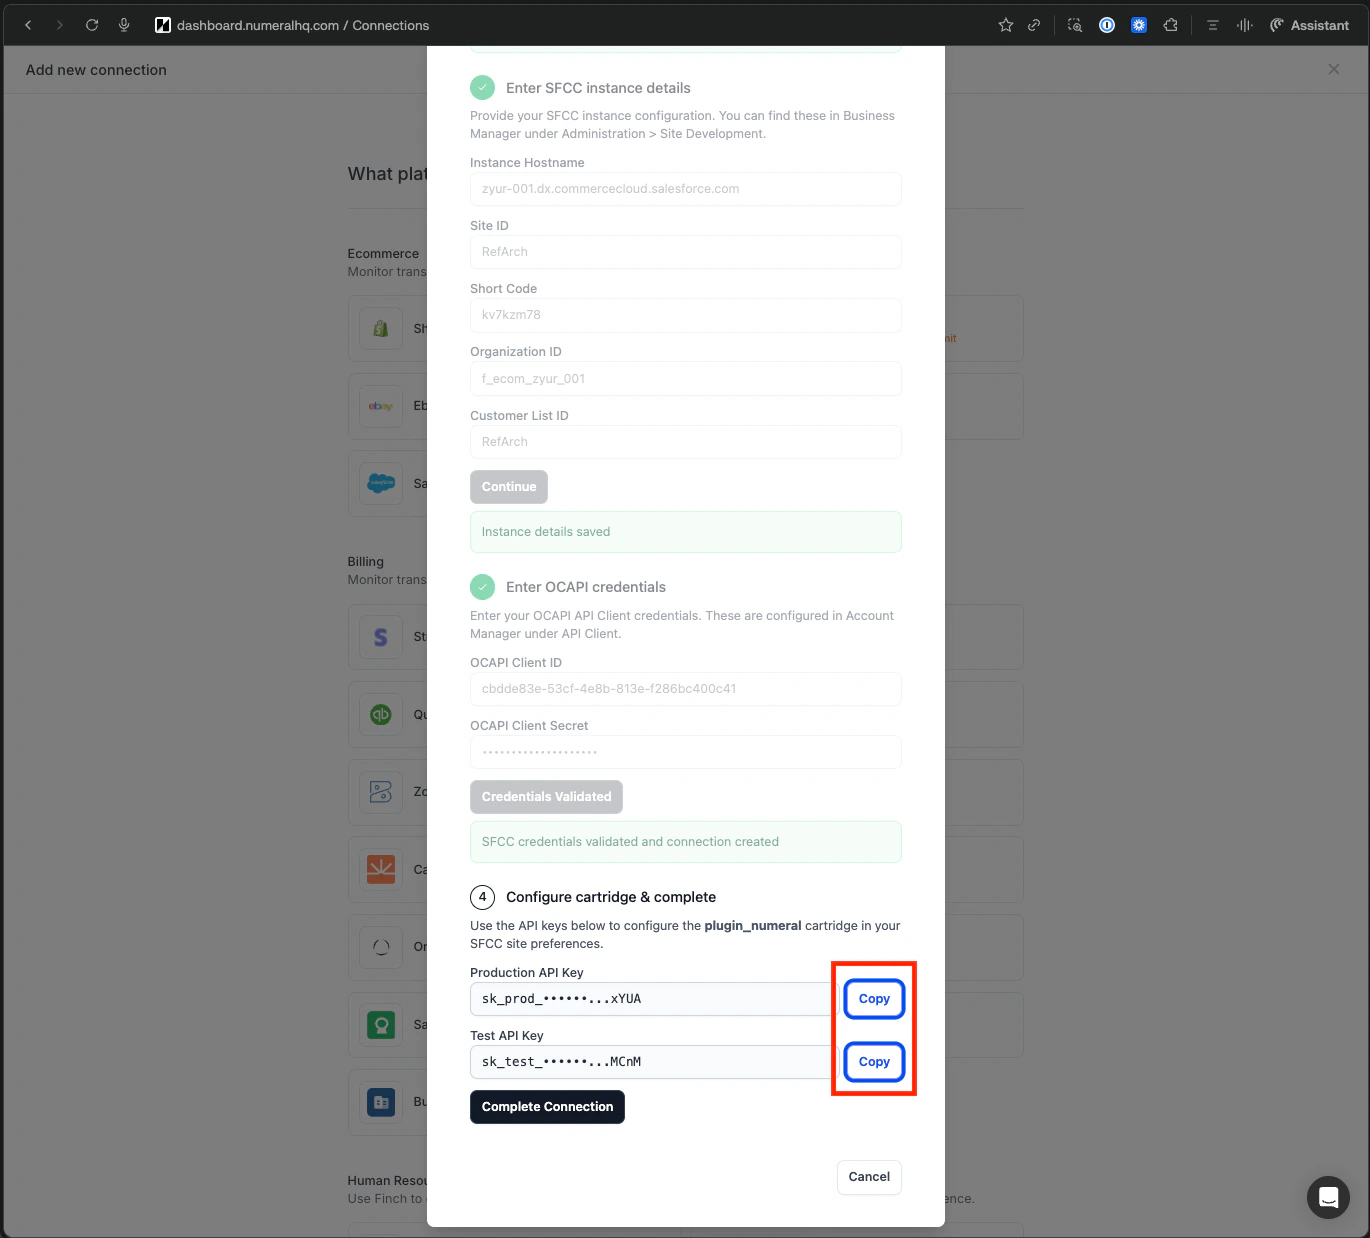
 Numeral will validate the credentials, sync your catalog as **General Merchandise**, and provision a Fivetran connector for ongoing sync.
### 6. Generate API keys
Numeral generates a `sk_test_*` API key for your sandbox. Once you're ready for production, generate a `sk_prod_*` key and update `c_numeralApiKey` in your production site preferences.
Numeral will validate the credentials, sync your catalog as **General Merchandise**, and provision a Fivetran connector for ongoing sync.
### 6. Generate API keys
Numeral generates a `sk_test_*` API key for your sandbox. Once you're ready for production, generate a `sk_prod_*` key and update `c_numeralApiKey` in your production site preferences.
 If you operate multiple sites or storefronts, create a **separate Numeral connection per site** so each site has its own API key and transaction history.
## Troubleshooting
Confirm `plugin_numeral` is the **first** entry in the cartridge path and the API key in `c_numeralApiKey` matches the environment (test vs. production). Check **Custom Log Settings** for HTTP errors.
macOS Finder mounts WebDAV read-only. Use Cyberduck instead. Confirm your Business Manager user has WebDAV file access enabled.
Verify all seven scopes are listed under **Allowed Scopes** on the API client and that the OCAPI Shop API and Data API JSON configs have been imported in Business Manager.
The cartridge writes attributes only after a successful tax calculation. If logs show a calculation error (timeout, network issue, invalid address), the attributes will not populate.
If you operate multiple sites or storefronts, create a **separate Numeral connection per site** so each site has its own API key and transaction history.
## Troubleshooting
Confirm `plugin_numeral` is the **first** entry in the cartridge path and the API key in `c_numeralApiKey` matches the environment (test vs. production). Check **Custom Log Settings** for HTTP errors.
macOS Finder mounts WebDAV read-only. Use Cyberduck instead. Confirm your Business Manager user has WebDAV file access enabled.
Verify all seven scopes are listed under **Allowed Scopes** on the API client and that the OCAPI Shop API and Data API JSON configs have been imported in Business Manager.
The cartridge writes attributes only after a successful tax calculation. If logs show a calculation error (timeout, network issue, invalid address), the attributes will not populate.